
🛡️ Guard Your Gutters in Style!
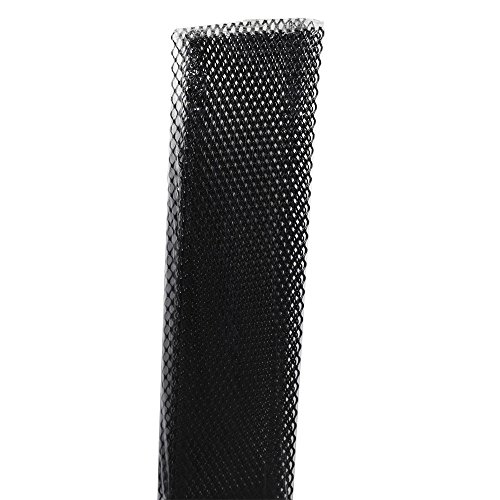
The Flex-Drain 441-253 Lock-On Gutter Guard is a durable, easy-to-install solution designed to keep your gutters free from debris while maximizing water flow. Made from sturdy galvanized steel and featuring a sleek black powder-coated finish, this 3-foot guard locks onto 5-inch K-style gutters and covers 15 feet per pack, ensuring your home stays protected and stylish.
| ASIN | B00LTJTAZ2 |
| Batteries Included? | No |
| Batteries Required? | No |
| Best Sellers Rank | #80,081 in Tools & Home Improvement ( See Top 100 in Tools & Home Improvement ) #18 in Gutter Guards |
| Color | Black |
| Customer Reviews | 4.6 4.6 out of 5 stars (1,998) |
| Date First Available | July 15, 2014 |
| Is Discontinued By Manufacturer | No |
| Item Package Quantity | 1 |
| Item Weight | 2.79 pounds |
| Item model number | 441-253 |
| Manufacturer | Cleveland Tubing, Inc. |
| Part Number | 441-253 |
| Product Dimensions | 36 x 5.75 x 1 inches |
| Size | 3-Feet |
| Style | Gutter Guard |
M**B
Super easy, simple product, great quality
This product is just simple mesh, cut and formed for the specific use of gutter protection. There is a perfect balance between rigidity/thickness and how bendable it is, and it is easy to cut with tin snips. I only have 40 linear feet of gutter, so I was able to do the job in a few hours. I have a 4" gutter, so the width of this product is more than is needed, but it tucks neatly under the roof tiles. In the few places where the roof material was unyielding and I could not tuck much of the mesh underneath, I simply trimmed the mesh shorter to fit. All that is needed is a pair of supple work gloves, a good pair of tin snips, a power drill with 1/8 bit, some small screw and screwdriver. I placed 2 screws per section which is plenty to anchor the guards no matter how strong the wind blows (screws do NOT come with the product). I strongly recommend the gloves, as there are sharp edges and barbs along the cut edges of the mesh that will nick your hands without protection. The mesh of this product is rather large, which is fine to block big leaves that clog gutters around here, but if you live in an area with trees that drop a lot of fine or very small crud, then you might want something with a finer mesh. The other consideration that I am dealing with is the steep pitch of my roof; water runs fast into the gutter, therefore gutter guards with a fine mesh can actually cause the water to "bounce off" and not trap or catch enough of the runoff. This is another reason that these Amerimax guards are perfect for my needs. Overall this is a great product that is easy to install and should perform as intended for several seasons.
T**A
Easy-to-Install Gutter Guards – Perfect Fit and Great Value!
We absolutely love these gutter guards! They fit perfectly and were relatively easy to install—one box took about 1.5 hours. Our 1 story home is 2,000 square feet, and we estimate needing three sets to cover three sides, though we may stop at two boxes (focusing only on the sides and areas that collect the most leaves) to save some money. The only tools we used were a small pry tool (like a flathead screwdriver) and tin snips (or in our case, since we didn't have any on hand, we used heavy duty pruning shears) to trim a few pieces to fit shorter gaps. Each box contains 25 interlocking pieces, each 36 inches long, covering a total of 75 feet. You slide them under the shingle then snap them into place inside the gutter. We just ordered our second box, and we couldn’t be happier with the quality and convenience of this product! Highly recommend.
B**T
Install tips - It's easy
I love them so far, but only 4 stars because I can't review how they've lasted through the winter because I just installed. I bought one box which covered my whole house with three sections left over. I'll keep these spares in the garage, although I doubt I'll need them. Measure first, and buy enough. One box is roughly 70 feet, (NOT 75 because each section overlaps by half an inch, and because with each run you'll be cutting a piece in half.) I found installation very easy using almost zero tools but there were a few small issues and I have a few tips. 1) After cleaning my gutters and thoroughly flushing the downspouts, I learned that the "low end" isn't where the downspouts are located. I've read that it's best if I adjust the height of the gutter so they're higher by 1/4" for every 10 feet. If you're going to do this, do it at this point. Although I didn't do this, (and may regret it later) I noticed that you don't need a level... Water itself will tell you if it's running toward the downspout, and in my book that's good enough. 2) Make a very simple but handy tool: Straighten a wire coathanger, then bend 1/8" of the tip at a 90 degree angle with pliers and form the other side so you can grip it to pull. You can use this to "hook" into the mesh to manipulate it around as you overlap the ends of each section. You'll find that the previously-placed piece will shift back under the shingles when you place the new one, so this helps. I also tried a large paperclip with a loop over my index finger which worked fine too, but after I lost it in the weeds I went with the coathanger. 3) In some spots, the gutter guards wouldn't slip far enough under. In those areas I cut some of the gutter guard away. You'll also have to cut the "final" piece at each run for a proper fit. 4) Yes tin snips would work, but for speed and straight cuts I used an angle grinder with a cutoff wheel (And when I say use safety goggles, I REALLY mean it for this job!) A Dremel with a heavy-duty cutoff wheel would also work and would probably get better results. File or heavy-grit sand the ends to get rid of cutting points. 5) In my case I have asphalt shingles, which flex, so this probably made things easier. Although instructions say put the mesh under shingles, in my case the underlayment goes all the way to the edge, so I put the mesh under the underlayment. Probably not critical but it seems less likely to damage the underlayment that way. 6) In a few places there were nails in the wood, below the underlayment. They catch in the mesh. If you find it won't go under far enough, check for a nail and lift it up over the nail. 7) I found it easier to go right-to-left than left-to-right, because the piece on the left should go above the piece on the right.
Trustpilot
2 months ago
2 months ago


