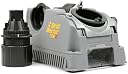


Desertcart purchases this item on your behalf and handles shipping, customs, and support to Brazil.
โ๏ธ Sharpen smarter, drill sharper โ never settle for dull tools again!
The Drill Doctor DD500X is a high-speed electric drill bit sharpener designed to restore twist drill bits from 3/32" to 1/2" with precision angle adjustments of 118ยฐ or 135ยฐ. It supports steel, masonry, carbide, and tin-coated bits, featuring split point sharpening to enhance cutting performance and durability. Engineered and calibrated in Oregon, it offers portability and a 3-year warranty, making it an essential tool for professionals seeking to maintain peak drill bit sharpness and efficiency.


| Customer Reviews | 4.6 out of 5 stars 2,671 Reviews |
K**N
Great Drill Bit Sharpener
I have been using this for several weeks. The pluses of the Drill Doctor 500X are the overall quality of the product. This is excellent. It works well allowing you to sharpen standard point, split point and masonry bits. The split point can be sharpened at 118 degrees or 135 degrees. The bits come out sharper than new. The only minus of the Drill Doctor 500X is it can be a bit confusing the first couple of times sharpening a bit. I found that there are several on line videos that are good to review. But once you get the hang of it this is a great tool I recommend it.
P**R
A surprisingly effective tool
Excellent tool. Had a project working on an car exhaust drilling through some really hard stuff with solid carbide drills. This sharpener did an amazing job sharpening those. I was really surprised just at how sharp it made them.
E**R
It's a drill bit sharpener.
First off, this machine is quite good.it will sharpen dull bits as good as new.the actual sharpening process is quite easy and quick.the instructions to get there are a little vague.if your grinding a 118ยฐ angle the printed instructions doesn't tell you what notch to put the chuck in to get the desired relief angle.you have to keep resetting the bit and selecting the next notch and regrinding to get the desired relief angle.for the 135ยฐsetting the instructions do tell you the notch to select. And the port to grind the split point is straight forward.i used that port on a 3/ 8th's bit it dressed the point up nicely but it didn't grind the whole flute.( Probably the bit stick- out from the chuck is the reason). Overall I'm well pleased with the machine.it eleminates the errors and guess work that come with free hand sharpening.the vagueness of the printed instructions is the reason for 4 stars.it does an excellent job and in my opinion,worth the cost of the purchase price.a d with a three year no product registration hassle free warranty the cost is reasonable. Once you get the process to get the bit set to grind down pat your in business.i recommend this product to anyone who's not looking to keep on buying bits to replace the dull ones.
S**A
worth the purchase!
I love this product! I sharpened 12 drill bits in under 20 minutes and each bit sharpened perfectly like brand new! The Drill Doctor is so easy to use too! I read a few reviews, stating difficulty using it, noise was to loud, works good but difficult to operate. Bologna!!!! I'd give the Drill Doctor 10 Stars!!!!! Its quiet, no vibration, simple clean up and storage!!
S**I
Its a great tool to have around.
This is my 3rd Drill Doctor, the first one I sold on a garage sale because I needed money, 2nd was pretty much wore out before I bought it from a garage sale. This new one is my favorite the 500x and I opted to buy a secone chuck that would go to 3/4 it was cheaper to do it this way that buy a 750x. I work in plastics and have to sharpen my bits due to drilling sometimes close to 1k holes in a day. With that in mind plasitics are the worst to set up for, they require an anle of about 118 degrees, with a split point and a pretty severe angle from face to heel. We drill as large as 1/2" not pilot hole so bits need to start quick and cut rapidly otherwise they just clog up with plastic. The 118 most closely simulates the best working drill bits we use. It does however take a bit of studying and the use of a black sharpee marker to get it set up and figure out how to get it to produce the correct angles. Coat the tip with sharpee then setup your bit at zero. If you look at the alignment port there are several slots for the chuck to go in, the one in the middle marked 118 is the 0 advance or retard of the bit, the port is marked + on the left and - on the right. As I said coat the cutting end with sharpee ans make about 1 to 2 full revolutions then check to see if they cut looks right. if the cutting edge is getting rolled over or the back angle is too flat, insert the chuch turned more to the left + side this will cut deeper to the heel and stop the roll over. If you have problems read the instructions they are not too bad and experiment with clocking your bit timing in the chuck. If you desire to split point your bit after using a clocked setting you will need to reset you bit in the chuck at the zero 118 degree position before or the split point will mess up your nicely sharpened edges. Takes a bit of playing to figure out how to make it work but all in all when you get it sorted it works well and sharpens well.
G**Y
Well-built drill bit sharpeners.
This is my second Drill Doctor. They are fantastic sharpeners. The first one was a DD 250. It is still in use after 25 years. I have sharpened maybe 300 or more drill bits with it. It still has the original stone. I received my new DD 500 yesterday. It is basically the same machine but, upgraded, and can sharpen masonry, and split point bits. Sharpened about 20 steel bits in about 20 minutes or so. Also, tried sharpening masonry bits. Takes a little getting used to but, after a couple of tries it worked great. On the masonry bits I would recommend starting with a bit about 1/4" or so until you get the hang of it before you try any smaller ones. They are a little harder to sharpen. I sharpened bits down to 1/8". I would recommend this sharpener to anyone looking for drill bit sharpener. They are very well-built and easy to use machines. Just follow the directions, and you will do fine.
A**E
No need to buy drill its ever again!
Just received this today and very pleased with this purchase. Despite some other reviewers comments, the instruction manual is comprehensive, easy to understand and fully explains the operation of the Drill Doctor. I had no trouble setting up for 118 or 135 degree point angles. I resharpened some 34 drill bits from 3/32" to 1/2" that were blunt and changed one from 118 degrees to 135 with a split point. It took about 1 hour and 15 mins in total. After, they all were sharp, exactly to specification and cut through wood and steel like they were brand new. The 135 deg split point drill bit I cut (5/16") produced the perfect Curly Q's as shown in the photo, when cutting through a 1/4" mild steel bar with my drill press. I've always tried to hand grind my drills or bought new. While they were fairly sharp and drilled OK after my hand grinding, they certainly looked hand-ground and weren't like a new drill bit with a well-defined chisel edge, relief angle, even cutting edges and a perfect point angle. With a couple minutes work in the Drill Doctor, I have perfect bits. Points to note: - The 135 deg point angle setting is the one notch to the right of the 12 o'clock positioned 118 degree notch in the alignment port. The other 10 deg notches are to fine tune the chisel edge and relief angles, which 99 times out of a 100, you won't need to adjust. - Make sure the spring steel jaws in the alignment port snap into the drill at its narrowest point across the width of the flutes. Rotate the drill bit as required to make this happen. This ensures the correct angular position of the bit in the chuck for grinding. - After finger snugging the bit in the chuck in the alignment port, remove it and hand tighten. That way the drill doesn't move from its perfect alignment for grinding. - Keep rotating the chuck in the grinding port with light pressure down and keeping the chuck against the cam pin, grinding until the grinding sounds stop occurring. The bit at that point is fully ground. - Eventually the grinding wheel will wear down. You can remove it and turn it around to get another 100 or so drills sharpened before having to replace the wheel for about $20. After doing all my 34 drills, I could feel that the roughness of the grinding wheel was less that the other unused end, but it was still easily capable of grinding bits. - Grinding dust does spill out onto the bench through the gaps around the transparent cover under the grinding wheel. After all my bits, I had a tiny heap on the table, with more inside the machine. I cleaned the Drill Doctor before putting it away, per the instructions. - Don't mash the bit into wheel, especially for making the split point. Treat it gently and pulse it until the sound stops. I've now got a way to have sharp drill whenever I need them. I always had to make do or go buy yet another drill bit. The Drill Doctor is not a cheap tool, but it is well-made and sturdy. Once you have it, you can really appreciate its value. No regrets at all. I will never need to buy bits again until I've worm them down to an unusable length and by then, that will have paid back the cost of the Drill Doctor many times over!
A**R
Efficiency and ease
Yes, simple tool, easy learning curve , great results. Itโs a tool you wonโt use often. But a nice addition to the tool shed.
V**N
Bien
Parfait attention c est en 110 v
S**R
Works excellent! Very happy!
I had a Drill Doctor 350 which was ok but it could only sharpen an angle of 118. I drill a lot of metal and 135 is a better angle for this material. I upgraded to the 500 and WOW am I ever impressed. The 500 can sharpen both angles and do it well. Thereโs not big learning curve either. Thereโs a video on using it as well as a pretty good manual included. I honestly donโt think Iโll ever need to any new bits for quite some time.
F**E
Dat het werkt
Handig en snel
่ฒด**A
ใใชใซใฎๅใๅณใใจใฆใ่ฏใใชใใพใ
ๅ่ชฌใฏใคใณใฟใผใใใใใ่ฆใฆไฝฟ็จใใฆใใพใใ ใใๅใใใซใใใจใใใฏใใใพใใใ ไฝใจใไฝฟใใฆใใพใใ ไธๅ้ๆฟใๅใใชใใฃใใใชใซใ่ฆ้ใใใใใซๅใใใใใซใชใใพใใ
M**N
110v not 220v
Carefull i blew it up with 220v . My fault but i was not able to test it.
Trustpilot
1 day ago
3 days ago