Buy anything from 5,000+ international stores. One checkout price. No surprise fees. Join 2M+ shoppers on Desertcart.
Desertcart purchases this item on your behalf and handles shipping, customs, and support to Brazil.
๐ Upgrade your ride, outshine the rest!
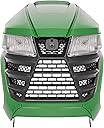
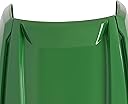
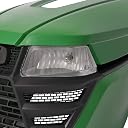
The HECASA Complete Hood Kit is a durable, ABS plastic replacement set designed specifically for John Deere X300-X394 lawn tractors. Featuring a stylish green and black finish, it includes hood side panels, an upper hood, and a front grille with integrated headlights to enhance both appearance and functionality. This kit offers a cost-effective, easy-to-install alternative to OEM parts, improving tractor visibility and protecting your engine with rugged, weather-resistant materials.


| ASIN | B0DF5BXZQM |
| Auto Part Position | Front |
| Automotive Fit Type | Vehicle Specific Fit |
| Best Sellers Rank | #96,726 in Automotive ( See Top 100 in Automotive ) #16 in Automotive Hoods |
| Brand | HECASA |
| Brand Name | HECASA |
| Color | Green and Black |
| Compatible with Vehicle Type | Tractor |
| Customer Reviews | 4.1 out of 5 stars 71 Reviews |
| Exterior Finish | Painted |
| Fit Type | Vehicle Specific Fit |
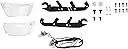
| Included Components | 1 set of Complete Hood Kit (including hood side panel, upper hood, front grille with headlights). |
| Manufacturer | Wofeili LLC |
| Manufacturer Part Number | MO-3916 |
| Material | Plastic (ABS) |
| Material Type | Plastic (ABS) |
| Model Number | MO-3916 |
| OEM Equivalent Part Number | AUC13489, AUC13490, M168883, M168888 |
| Style | Custom |
| Style Name | Custom |
M**N
Fit,Quality,and Value! Buy this product!
Im not quite sure of what people are talking about when it comes to assembly,and difficulty. It came with no instructions but putting it together was pretty self explanatory, it took me ten minutes 2 of the course bolts hold the headlight lenses, the other six secure the hinges to the grill with the hood itself sandwiched between the two. The inner cowling locks into place via the snap clips. The center panel locks into place with the hooks on the side panels. Another note is that this will fit any x series lawn tractor, even if it is air cooled! I give 5 stars because of the simplicity of assembly, fit,and fuction. It's half the price of the oem John Deere original and better material! Buy this! You won't be disappointed!
D**5
Here are your instructions!!
I deducted a star due to lack of instructions and the inferior headlamp harness. This was a challenge. I got it together but it requires someone who is tenacious and not new to problem solving. I found the review saying he did this "in a few minutes and it was super easy" to be quite humorous. This was a challenge for someone who is used to DIY and doesn't give up easily. It IS a well-made hood. All of the controversy could be easily alleviated with a set of decent instructions. There were NO INSTRUCTIONS. SO - In the interest of world peace - here are my post install insights: 1. The package comes in two boxes. If you have an older JD Hood that you are replacing - be sure to save the wiring harness for the headlamps. The crappy headlamp harness that comes from this kit is really low quality and will wink as you simply drive down your concrete drive - forget about a grassy yard. 2. Understand that the way this goes together will finally result in something that both stays together and is solid (even though is has multiple parts) but that is NOT clear at the outset. YOU will be happiest if you have a decent work area where you can move the parts around without worrying about scarring it up. Get an old blanket and work on that. 3. When viewed from the outside and standing in front - there is a green top panel of the hood and two green side panels for the hood. These three pieces must be slotted together. I found that one of the side panels connected to the top easily and locked in quickly and that i was not able to do the same with the other side panel due to the weight and the fact that I needed to press at both ends to fully seat the slots and only had two hands. Once I had another set of (relatively strong) hands I was able to get it all seated and slotted together. 4. Next comes the front grill. Remove the protective film and install the clear headlamp covers with the screws provided but go slow so you don't strip out the plastic. The bulbs go in and out through the slotted openings for the head lamp sockets after the hood is assembled and not from the clear covers. I found that the screws from my old JD hood were a better fit and held better. Place the green top and side panels on the work area and get the two metal brackets that attach this hood to the tractor. This next part was only clear after I completed the entire job and it dawned on me, only then, that i had missed a piece and needed to partially disassemble to correct. SO - with the parts upside down and sitting on your pad get the grill and place in the front opening and get one bracket and figure out which way to orient it. (see photos) Each bracket has a opening at the forward end that will slot down onto the cam type receiver when you install the hood. This design allows you to remove the hood with no tools when all is completely assembled. So - the brackets should be oriented so that the forward opening is closer to the center of the mower and then the bracket (as viewed from above seems to go outward as it moves toward the back of the hood. When installed in this manner the brackets seem to spread out a bit as it fits in place and will allow clearance of the box like frame at the front of the mower. (If you have this "right" it will look sort of like you are holding your hands out to pick up a bowl or box). It will not clear if these are reversed and it slants inward in that case. With these in the correct orientation you get to my mistake. The bracket has holes that are set in a series of steps. The first bolt seemed to go into the first green panel receiving hole - but I should have included the small green panel that will wind up at the bottom under the front grill and headlight assembly and right near these bracket forks. I left this off and it works fine without it but looks better (and is much more stable) with it. This little panel has a large funnel like hole that slides over the first panel mounting receiver hole so that the two green pieces are "stacked" and the bracket step and bolt will hold it all together and trap that panel at the top and really lock the front together. I can tell you that positioning all this together and getting these bolts to line up is pretty maddening. I think having a 16 penny nail to slide in and line things up (or maybe a ice pick) will help you get things aligned so you can get the screw(s) to grab. 5. Now you get to the black plastic inner cowl that funnels air to the engine. Don't skip this important piece just because you are frustrated!! It is crucial to keep it running cool. The tabs must be lined up and it took a couple of my largest flat heads to use as pry bars to ease things into place. The edge of the cowl will lap over the green side panel edge and provide a pretty smart looking edge once things are in place. It is a very satisfying sound to hear that last piece "pop" into place and you are actually done. Actually - sorry to tell you - but you are not. There are two holes that will be closest to the steering wheel when this hood is on the mower. There did not appear to be any way to hold them in place. I wound up buying a 1" x 1/4" bolt, 2 ea flat washers and a nylon insert "locking 1/4" nut to hold this cowl at that point. My take was that the cowl was SO painful to get seated and finally in place properly and I was not about to use a push pin to hold this and risk it popping out of place. With no instructions I have no idea what their plan was but I KNOW that mine is secure and will not come off because of the nylon insert on my nut. It was very difficult to get the nut under the bottom lip of this cowl. It took me 20 minutes to do this next to the last step. I used a small vise grip to hold it while I tightened from the outside and cinched up the nylon lock nut. 6. Finally, you may need to install the cam mount to receive the forked opening from the front brackets. I made the mistake of scavenging the parts from my original hood and did not snap a picture of what it looked like before I took it off. You will be interested to look at the photos I included. The cam installs with the included carriage bolts. This bolt installs in a slotted, elongated, rectangular hole that is perfect for both the shoulders of the carriage bolt as well as the square cog (beside the hole on the flat back of the cam). Then put the nut (MAKE SURE you have the nut with the nylon insert to keep this in place and snug. (This lock nut comes with the kit.) Now you are done โ and the finished hood and brackets should drop down onto the cam receivers. Hope this helps along with the pictures. NOTE: BE SURE and peel off the protective cover on the side stripe decals. I did not realize at first that it was protected. Pictures show before and after that was done. I would have paid about $50 more to have instructions. Hope you have a better experience and agree. :)
S**Y
excellent
excellent product and people - need instructions but one can figure it out
M**E
2012 John Deere X360 Replacement Hood Assembly
This Hecasa Complete Hood Kit looks great and the assembling was not difficult. Had my original hood to refer back to. Took my time and completed it with only a couple of screws that did not tighten as I liked. Wrapped black electrical tape around the threads and that fixed the issue. Overall this is a great product and you can not beat the cost.
M**.
Poor quality - no instructions
Poor quality comes with no instructions. Not very difficult to assemble but instructions would have been helpful. Hardware not sturdy at all, lifted the hood twice and it open the hinge/cog and it would not stay open on the stop after two tries. Bends out of shape really easy.
A**R
Mine, and others from the comments, did not come with instructions. DOES NOT come in one piece.
Fits well once you figure out how it goes together. COMES WITH NO INSTRUCTIONS. But if you are mechanically inclined you should be fine.
N**K
Excellent product
A wonderful wonderful replacement for the original hood that we broke off of our John Deere. Loved it worked perfectly easy to install. Makes the mower look brand new. Would totally recommend would repurchase if need be.
D**R
Hard fit hood
Well I am not happy with this hood like all the new parts that comes with it also I got instructions with it , and here comes the but I had to use JB weld to keep it together in 7 spots in the end it fit and looks good will not buy again.
A**R
Instructions
Poor instructions. Looks great
Trustpilot
2 days ago
3 weeks ago