We remain fully operational. Our teams are working around the clock to ensure your deliveries continue safely.

DOWNLOAD THE APP


Customer Services
Copyright © 2025 Desertcart Holdings Limited
DOWNLOAD THE APP


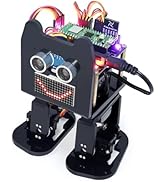
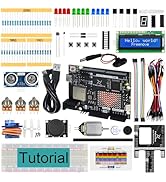
🤖 Step into the future of DIY robotics with wireless control and expressive LED flair!
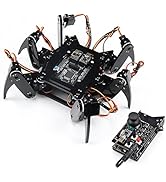
The Freenove Bipedal Robot Kit features a Raspberry Pi Pico W dual-core processor with wireless LAN and Bluetooth, enabling wireless control via a dedicated app on Android and iOS. It includes a colorful LED matrix for expressive animations, ultrasonic obstacle avoidance, buzzer, speaker, and modular laser-cut acrylic parts. Designed for hands-on learning, it offers downloadable step-by-step tutorials and complete code, making it ideal for tech-savvy millennials eager to build and customize their own advanced bipedal robot. Battery not included.


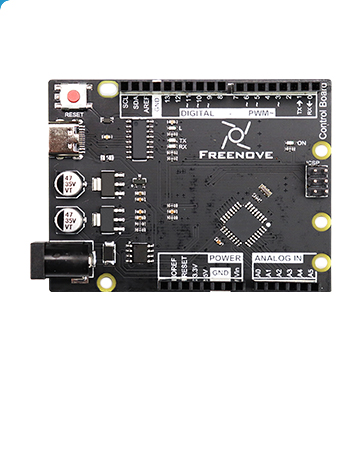


| ASIN | B0D254SQLH |
| Are Batteries Included | No |
| Best Sellers Rank | 132,071 in Toys & Games ( See Top 100 in Toys & Games ) 1,499 in Educational Science Kits |
| Brand | FREENOVE |
| Colour | Raspberry Pi Pico W |
| Customer Reviews | 3.9 3.9 out of 5 stars (38) |
| Date First Available | 19 April 2024 |
| Delivery information | We cannot deliver certain products outside mainland UK ( Details ). We will only be able to confirm if this product can be delivered to your chosen address when you enter your delivery address at checkout. |
| Graphics Card Description | Integrated |
| Graphics Card Interface | Integrated |
| Graphics RAM Type | SRAM |
| Guaranteed software updates until | unknown |
| Hard Drive Interface | USB 2.0/3.0 |
| Item Weight | 460 g |
| Item model number | FNK0033C |
| Manufacturer | Freenove |
| Memory Technology | LPDDR2 |
| Operating System | Embedded |
| Package Dimensions | 19.9 x 9.2 x 8.9 cm; 460 g |
| Processor Brand | ARM |
| Processor Count | 2 |
| Processor Speed | 133 MHz |
| Processor Type | 5X86 |
| Series | with Raspberry Pi Pico W |
| Wireless Type | Bluetooth |
A**E
More than just a robot Kit
Freenove have come a little late to the bipedal robot party, there are plenty of others that have been around for a while. However, this is the first Raspberry Pi Pico powered bipedal robot that I have come across and that, for me, is a major plus. The Pi Pico is a much more powerful microcontroller than the Arduino Nano that powers most competitors that I have looked at. The Pi Pico runs faster and has more memory so has more possibilities for future expansion. The reason that I have said it is more than just a robot kit is that the tutorial covers each component and how to use it on its own before bringing it all together to give the fully featured robot. This means an opportunity to learn how to use the pi pico with servos, a buzzer, how to play mp3 files through a speaker, controlling leds, reading analogue voltages, using an led matrix and reading distances with an ultrasonic sensor. It also covers sending and receiving information via ir and Bluetooth. The robot parts themselves are made of laser cut acrylic, which for some parts, as far as I can guess, has been heated and folded to create more complex shapes. As with other freenove kits, the instructions for assembly are clear and easy to follow, although mounting servos can be a little tricky. I find it easiest to hold the nuts in place with a little bit of tape, before positioning and screwing together. (I have included a photo of a servo with nuts held with tape, at this point the bolts can be removed, the servo positioned and then assembled with the nuts held in position by the tape) It is important to follow the tutorial step by step. I had problems with the Bluetooth initially, but this was down to accidentally missing out a critical step. As ever with Freenove products, the support they provide was excellent and I soon got to the bottom of my mistake. The finished robot is lot’s of fun with plenty of scope for further development, such as creating my own expressions for the LED matrix. The board has spare ports for extra servos, so I may consider adding some arms in the future.
J**E
Disappointing Experience - Not Worth the Time or Money
Where do I even start with this frustrating and ultimately disappointing product? While the hardware itself *could* have potential, but it leaves a lot to be desired. **Hardware Issues:** - The lack of multiple LEDs to differentiate between power sources (USB vs. battery pack) is a missed opportunity. - The soft button toggle switches are difficult to use, and the board's memory behavior is confusing—e.g. it's not always clear whether the system is on or off. I'm fairly certain my original RP2040 Pico board was damaged. The Arduino "shield" is rated for 9V DC, while the USB provides 5V DC. This discrepancy should have been addressed more clearly. Assembly is an absolute nightmare. The screws used are incredibly tiny—more suited for a watchmaker than anyone assembling this kit. The self-tapping screws into tough ABS plastic are a challenge, and there’s a real risk of stripping the heads, even with minimal force. Additionally, the servo gear wheels have holes that are either too small or too large for the provided screws. Even worse, there are extra, unnecessary holes in the gear wheels, which only adds to the confusion. **Software and Setup Issues:** - The process of uploading code was problematic. My board kept getting stuck in bootloader mode, and even after clearing the cache, the Freenove arduino board would hold onto the memory and execute code repeatedly. This often made the board a one-trick pony, constantly running programs I didn’t want it to. - The Arduino IDE screenshots in the manual didn’t match the latest version of the software, and when I tried using the version shown, it didn’t even align with the manual’s instructions. This inconsistency only added to the frustration. - My Windows 11 PC would occasionally recognize the port, sometimes not. The Arduino IDE could not even identify my Freenove board or its drivers. The manual doesn’t provide any useful guidance on how to resolve this either. **Tutorials and Documentation:** The tutorial appears to have been hastily written, with some sections completed by someone who might have had an idea of how to create a tutorial, only to be replaced by someone who clearly had better things to do. It’s filled with unnecessary code and unclear instructions. A prime example is the 10 pages of Python code required to calibrate the servos—overcomplicating a process that should have been simple. Overall, I wouldn’t recommend this "kit" as an introduction to STEM or robotics. It’s frustrating and difficult to work with, leaving you with more questions than answers. If this were an assignment for first-year undergraduates, it would force them to learn more about microcontrollers, but at the cost of a deeply frustrating experience. I would advise tutors and colleges to take note before recommending this as a project otherwise yeah let them sweat over it!
G**N
Christmas present
Great model, instructions could be better.
A**R
Well made.
Made well enough, but not likely to become a terminator.
A**R
Very poor instructions and complicated
Its a waste of money buying this as installing and configuring is a pain as instructions are very very poor with mistakes. Very hard to understand errors. I've been trying to set it up for last 3 or 4 months but no luck. I've given up.
S**E
Yet again rubbish
Rubbish
K**B
This was a very fun project. It requires you to download a zip file, that contains the full tutorial, and includes instructions, and all the software projects. You will be directed to download and install the Arduino Integrated Development Environment (IDE), and all the instructions to do so are reasonably clear. Note: Depending on your PDF viewer, if you've zoomed in on the PDF tutorial further than a full page view, your mouse wheel may not scroll through the pages. You'll want to ensure that mouse wheel scrolling changes pages, because not all pages are listed in the index at the left. You begin by setting up the Arduino IDE and loading a sketch (program) and installing it on the raspberry PI, which will set all the servos to a known angle, after you connect them. Then comes the hardware assembly. There are a few minor mislabels, and you will need some patience, and some tweezers would be useful, as some of these nuts and very very small and need to go into places that were too small for my fingers. Half way through assembly you will be directed how to connect the servos to the PI and turn it on, which runs the program you already loaded to set the servo angles to 90 degrees, so that you can mount the legs in the proper orientation. Once it's all together, the software tutorial starts. They have included a large number of simple programs to load, each of which demonstrates how a single component is controlled (eg the speaker, the buzzer, the led displays, the coloured LEDs, etc). I was already familiar with the Arduino IDE, and controlling hardware through sketches, but I think they did a great job of simplifying it, and walking you through installing and running each sketch. You can either just use them as a set of component tests, or follow into their detailed explanation of how the software works, right down to what signals the IR remote sends, etc. It's not important to understand everything right away, you can go back later and re-examine it all, and learn it as deeply as you like. There are a few glitches and omissions, but for the most part everything was well documented, and easy to follow. eg 1: For the Chapter 1.5 LED matrix sketch, the instructions appear to have left out a library you will need to install to compile the sketch: the "adafruit_gfx" library. Install it when you see the instructions for installing the Freenove_VK16K33_Lib, by following the same procedure. eg 2: In chapter 4, it says "Sketch 04.4_Multi_Functional_Robot.ino is almost the same as 04.3_Multi_Functional_Robot.ino, except that it is added with the music play function." I found that the 04.3 sketch worked fine, but the 04.4 sketch didn't work well - the robot would stop responding after almost any button press, and the music functions didn't work at all in this sketch. As I said, I was familiar with the environment, so I pushed through the entire tutoral in one session, testing each component, and finally running "full control" via the IR remote-control and the phone APP. Start to finish, this took me 4 hours. The robot walking movements are fairly bad, and sometimes it's feet even collide with each other, but this project isn't really about making a walking robot - it's about learning. Learning how to put hardward and software components together, how hardware is controlled via low level software, and learning how to make it do new things yourself. I was really impressed with the whole package, and had a blast playing with it. I would definitely recommend it for anyone who wants to learn, on a detailed level, how things work.
L**A
Se lo compré a mi hijo para reyes y está genial, lo único malo es que el chip hay que comprarlo aparte
K**K
Ok
U**R
自由研究に買いましたが、解説動画も説明書も全部英語です。
B**R
For me, the is a great beginner robotic kit to start out with for those looking to learn either about robotics in general or the Raspberry pi or both. Good thing about this kit is it does come with a couple extra parts like a spare servo and spare screws just in case. The only downside was one of the legs cracked where the servos go, but I was a bit lucky that it only cracked where I was able to get the servo screwed in and used a little glue to fix it. The tutorial is downloaded which is a good thing in a sense as its almost 200 pages long to include the setup of hardware and software but the various things that the robot can do. Although the instructions could be a bit clearer than it is.
Trustpilot
5 days ago
3 weeks ago