Description
🚀 Elevate your maker game with the Ender 3 — where creativity meets resilience!
- HANDS ON MASTERY - Engage with a DIY build that sharpens your technical skills 🔧
- OPEN SOURCE FREEDOM - Fully open-source design invites endless customization and community-driven upgrades
- RAPID READY TO PRINT - Hot bed heats to 100°C in just 5 minutes for faster project starts 🛡️
- PRECISION MEETS DURABILITY - Advanced extruder with noiseless V-shape POM wheels for smooth, reliable prints
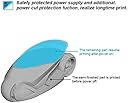
- UNSTOPPABLE PRINTING POWER - Resume printing seamlessly after unexpected power cuts ⚡
The Official Creality Ender 3 is a budget-friendly, fully open-source 3D printer featuring a robust resume printing function that safeguards your projects against power interruptions. With a build volume of 8.66x8.66x9.84 inches, it offers a hands-on DIY assembly experience ideal for beginners and students. Its advanced extruder technology ensures smooth, quiet operation, while a safety-certified power supply rapidly heats the bed to 100°C in just 5 minutes. Compatible with SD card and PC printing, the Ender 3 is a proven entry point into 3D printing, backed by a large community and extensive online resources.