Desertcart purchases this item on your behalf and handles shipping, customs, and support to Brazil.
๐ Secure your space with style and strength!
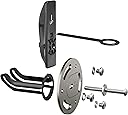
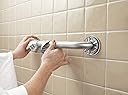
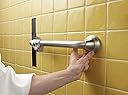
The Moen Chrome Securemount Anchor pack of 2 offers a robust, stud-free solution for installing grab bars that support up to 300 lbs. Featuring a sleek chrome finish and backed by Moenโs limited lifetime warranty, these anchors combine safety, durability, and easy installation to elevate bathroom security and style.


| Brand | Moen |
| Color | Chrome |
| Finish Type | Chrome |
| Finish Types | Chrome |
| Item Weight | 272 g |
| Material | Metal |
| Material Type | Metal |
| Style | Transitional |
| Style Name | Transitional |
| Weight Capacity | Maximum weight: 300 pounds |
D**Y
Securemount's Ingenious Design Makes Grab Bar Installation Simple, Damage-Free and Very Sturdy!
This ingenious mounting system for installing grab bars in a shower or bath area has been a lifesaver for our older family members. Normally, installing grab bars involves lots of work removing/damaging existing tiles or other surface coverings in order to find studs to use in installing grab bars safely. This great design allows someone to install them without harming tile or other surfaces and still get the safety and stability of connecting to the studs. Since he'd never seen this design before, I asked our handyman to watch a ten-minute Moen Securemount video on YouTube. He then installed them with ease. He was amazed at how simple the installation was, and how strong the grab bars were when installed with Securemount. In fact, he said he wasn't going to install any other grab bars WITHOUT using this smart system. We are MORE than pleased. The grab bars have been in place for more than a year and are perfectly strong with no issues whatsoever. And the lovely wall tile is as perfect as it was prior to installation. The bars give our seniors a greater level of safety, confidence and independence every day. Way to go, Moen! Thank you so much. THREE-YEAR UPDATE: We loved these at the beginning. We appreciate them even more after three years. Our Moen peened grab bars remain rock solid, look great, and a big part of the success of the installation (without damaging existing tile) is directly attributable to this ingenious installation system called Securemount. Our installer, who had never even used this system, installed it without any problems after watching a short how-to video online. Smart. Strong. Safe. Ingenious!
W**L
Worked well and very sturdy.
First class anchors for a tile surround over sheet rock. Very sturdy and easy install. Note if using Moen bars, you don't need the plates that come with the anchors. It is rather obvious but the instructions on neither product show that. Do yourself a favor and order the exact hole saw you need especially for tile an start your hole with a small bit to make sure you aren't over a stud. Would definitely use these again. Good design, good product. Suction cup grab bars are evil and should not be used anywhere.
L**O
Right Tools, Good Planning, Measurement Twice and Twice Again Thin Cut Once
Why did you pick this product vs others?: Firmly holds the grab bar. Build quality: Solid construction. The Instructions are good - read them several times. Gather the right tools. For a tile wall you should use a stud finder with deep penetration ability if you're on a tile or porcelain surface; these are available that also indicate if wiring or piping are close behind the wall. Use a diamond hole saw (with pilot drill) even on ceramic tile and especially on porcelain. I've installed three grab bars so far and my diamond bit is still cutting and should be good for at least a few more cuts; cool the bit with water a couple of times on each hole you make. I encountered an obstacle on one hole and had to insert the Securemount with arrow pointing horizontal; once in place I was then able to rotate the entire assembly to get the carrier arrow pointing vertical as required. In other words, be ready to adapt and overcome. Be sure to cover the drain with a cloth rag - you WILL drop parts, guaranteed.
C**E
Work well
These work well in the appropriate situation
B**S
A Molly on Steroids!
In order to install a safety grab bar for handicap use there are generally two options: 1) Use lags screws to attach it through the mounting plates into the wall studs 2) Use some form of Molly screw in the drywall in the cavity between the wall studs The former is straightforward and represents a very solid connection BUT it requires that the bar mounting plates line up over the studs--very often this is not the case. The bracket holding the bar needs to be located where the height, angle, and lateral positioning are correct for safe usage of the grab bar. Moen, a company already manufacturing grab bars, spent time developing what is without a doubt one of the most secure between-stud mounting devices I have ever seen. The design, materials used, and simple installation are all key to providing a secure mounting plate for safety grab bars that is beyond amazing. As they are unique, it is important that you read and then follow the instructions to make sure your installation of the parts is properly aligned--and UP and the BAR are marked on the parts. A hole (1 1/4") is all that is required, and a drill mounted hole saw at slow speed with low pressure will keep from damaging the back of the drywall. For one installation (in the tub area) I used a diamond hole saw to cleanly cut through the wall tile and the drywall. Once you install the backing plate, it is locked in place behind the wall, allowing you to remove the bar mounting bolt later if you need to. Regular Molly mounts do not permit this as the toggle inside the wall falls away if the bolt is removed. Important to know is that the footprint of the plate behind the wall is massive compared to standard butterfly Molly screws. Once installed, you simply use three machine screws to screw the bar's mounting plate to the Securemount faceplate. Trim rings on the grab bar cover the wall plates. While they may seem expensive, I do not believe you can put a price on safety, and I certainly have never seen anything that compares to the Securemount. Did I swing from the first bar just to be sure? Yes, 258 pounds dead hanging--and nothing: no sound no movement. I highly recommend the Moen Securemount and Moen grab bars to easily provide you with peace of mind.
B**B
Strong & secure. Hole saw bit needs drywall to engage. Updated remove to reuse info
Strong, smart, but have to be precise if using on both ends of the bar. Only item to be sure to have is a 1 1/4" hole saw bit. These are inexpensive, fit on any drill and usually come in a pack of assorted sizes. Used these the first time when installing the Moen toilet tissue/grab bar because these mounts came with that item - - easy peasy piece of cake. Later, I purchased the coordinating Moen towel/grab bar to replace an existing normal towel bar. I wanted this new bar to be installed in the exact same spot (in drywall) of the old towel bar so I wouldn't have a bunch of holes to patch. I purchased these mounts as an add on to give support as I knew I wouldn't be screwing into a stud. Important to keep in mind is if you want (as I did) to install in the same location as a previous bar, this means you will have the existing (smaller) holes in the drywall where the old bar bracket came off. This creates a problem when using your drill and the 1 1/4" hole saw. These hole saws are meant to hold themselves centered using a center drill bit, and make the larger hole relative to this center point. Because you already have an existing center point hole, there is nothing for the hole saw bit to hold onto and keep centered. I ended up taking the hole saw bit off the drill, and used a rubber mallet to pound it into the drywall deep enough so the teeth left an impression in the drywall and the hole saw bit would have something to grab onto. I needed the bar to be precisely in the same location because it was centered under a window. If this was not the situation and I could mount it give or take an inch or two, I would have placed the center bit just a 1/2" left or right of my existing holes. The 1 1/4" hole would encompass the old screw holes and the hole saw bit would still have "new" drywall" to drill through. A little more work and frustration this second time around, but the clean look and strength of these mounts make it worth it. * * update info on how to remove these mounts - Renovation of this bathroom meant that I was also changing out these grab bars for another style. My brother wanted to re-use these Moens for his bathroom so we commenced on figuring out how to remove them and keep them intact so they could be reused. We could find tons of YouTube videos on how to install, but nothing on how to remove, so here's that info for anyone who might wish to do so. Unscrew and remove the grab bars. Prying off the cover plates took a bit of delicate work with the edge of a small flat screwdriver. You need an allen wrench to loosen the bar from the mount. Once the grab bars are off, remove the screws that hold the mounting plate from the support insert. What you'll be left seeing is a thin round plastic ring around the big hole in the drywall. Use your fingernails to pry this ring off the drywall just far out enough so you can get a hold of it with your finger tips. Slide both thumbs into the hole and get a grip on this ring with your index finger. Wriggling and pulling out toward you, pull this plastic ring and arms out toward you. Eventually, the arms will click along the tracks and you'll be able to get the ring attachment fully extended toward you about 2" or so. At this point, if you don't care about reusing these mounts, just use a pair of snippers to cut the plastic arms and the support mount will just fall into your wall. The arms are still attached to the bracing piece so now you'll need to slide a finger along the top of the hole in order to push the vertical bracing piece to a horizontal position. I used my index finger, but my husbands hands were too large so he had to use a long screwdriver. Once the bracing piece is horizontal, slide your finger straight along the bottom of the hole to keep that piece horizontal and guide it (and the plastic ring/arms) out through the drywall hole.
C**D
Fast to install and extremely strong and well engineered.
I needed to put up a grab bar for my elderly parents. The stud spacing was impossible to work with. I refused to use toggle bolts or other types of drywall anchors. I looked around and found Moen, who made the bar I purchased, had a solution. These are incredibly well designed and thought out. I also think they are really cheap for the materials and precision of the fits involved. Just the stainless hardware and machined aluminum plate must cost them a ton. The "cleat" that goes in the wall is plastic, but it has very large reinforcing ribs and the threaded hole for the main screw has a metal insert so it won't strip. These are super fast to install. I weigh 300lbs and I could not make the bar bend or rock in the slightest. IMO the drywall screws will fail before this thing does. Make sure you get the model that matches your bar finish. The 1005 part is for stainless finish bars.
K**N
Excellent for mounting grab bars where studs are not available.
Previously reviewed. This kit is expensive but unique in quality and effectiveness of installation. Use the recommended diamond hole saw and tie a piece of string to the insert as a safety line until installation is done. I drill a small additional hole in the insert piece for the string. These mounts provide an extremely sturdy base for shower, bath, or other area grab bar mounting where studs are not available or extremely difficult to find through tile and cement board, or where there is some distance between the cement board and something like a shower insert. These work well in areas where there is a gap between backer wall and a shower insert with the addition of an appropriate thickness spacer.
L**E
Hold solidly
Sturdy and solid drywall anchor suited for Moen grab bars. Requires cutting a pretty substantial hole through the drywall.
K**L
Hand grab anchor
As advertised, good in theory but not suitable for my hand grab rail in bathroom. Will keep for future and make sure hand grabs compatible with bracket anchor
E**R
Great anchor
This is a good solid anchor. Requires some skill to install.
G**Y
Tricky but Great
These are strong and do the job when drilling into studs is not an option. Wasn't without its drama, as I dropped one behind the wall requiring me to order another one. Needs a fair amount of skill to install, but I eventually got it to work.
L**E
Easy to install
Arrived as expected with all parts nearly packed. Easy to install with little to no mess to cleanup.
Trustpilot
3 weeks ago
1 month ago