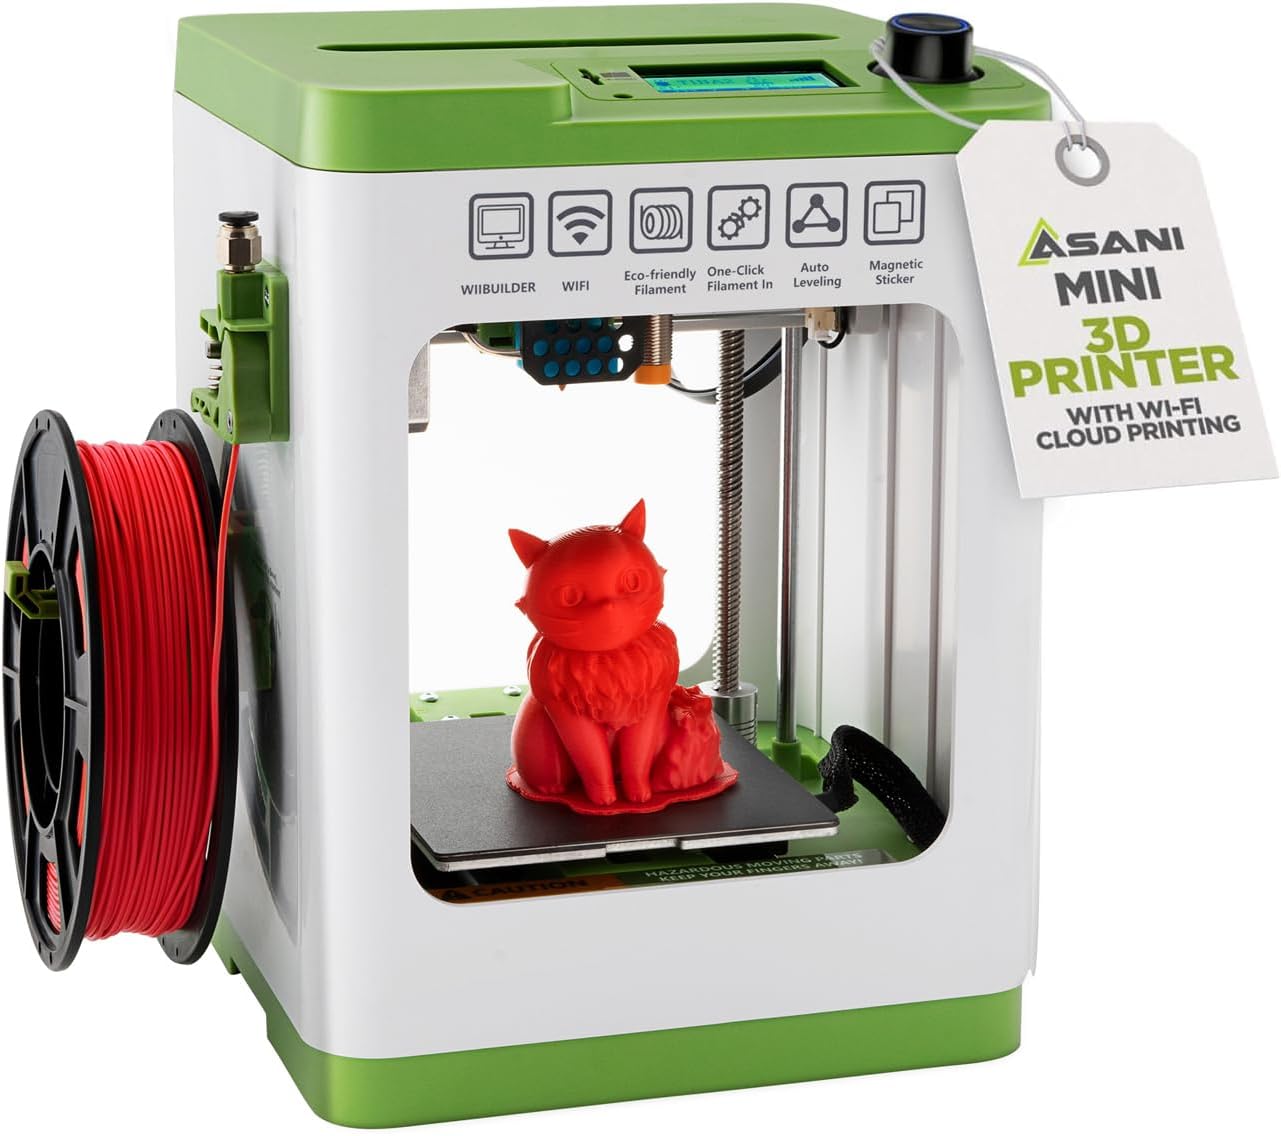
🚀 Print Your Dreams into Reality!
The Fully Assembled Mini 3D Printer is a complete starter kit designed for kids and beginners, featuring auto-leveling technology, a compact design, and compatibility with various operating systems. It includes 10M of PLA filament, a pre-installed microSD card with model designs, and a user-friendly interface for effortless creativity.
Color | Green |
Enclosure Material | Pla |
Compatible Material | Brass, Polylactic Acid, Thermoplastic Polyurethane |
Connectivity Technology | Wi-Fi, USB |
Operating System | Linux, Windows, mac |
Compatible Devices | Laptop, Personal Computer, Smartphone |
File Format | .OBJ, .STL, .GCODE |
Item Weight | 6.4 Pounds |
Item Dimensions D x W x H | 8.3"D x 8.3"W x 11.4"H |
I**M
It's so easy and works well!!
I had a project, and the easiest way was to do 3D printing for it. I've wanted a 3D printer since early Maker Bot days but never had the funds or enough reason to get one. So, after searching a while I found these. This model was actually one of the highest rated printers on all of Amazon. The build size is slightly limiting for the long haul, but sufficient for a while: 100mm height x 120m x 100mm. Once I received and unpacked mine the process was mind bendingly simple; just take off the tape, a stopper, a sticker, plug the tube in, put the filament roll on and put the end in the clampy feeder, insert the SD card, connect the power, pushed the reset button after selecting a language so I didn't even setup WIFI, selected load filament, picked a print from the SD card (called TF in the menus) and a while later I had my very own Benchy! I included pictures of the Benchy which was done straight out of the box without changing any settings. To me it's quite good considering. For reference I had broken Benchy during a stress test for my design is why the chimney is being used as a prop and there is a crack to one side of the front. I also made a design for the project I partly purchased the printer for at TinkerCAD which was MUCH easier than what I had expected to have to do. I'm aware there are more complex options available, but I'm still new and it was surprisingly capable. The model I made was created with .1mm precision in TinkerCAD, sliced and saved to the included SD card with the WiiBuilder program included on the SD card (super easy, just a couple clicks) and then printed directly from the SD card in the printer (so simple and easy). The print wasn't perfect, but I did .1mm building and the printer does .2mm printing so there were bound to be issues. I still successfully used the first print of my design, it's a CPU cooler adapter for a mini pc and I included a picture of it in action. I'm printing a fan cover for the cooler currently and I'll include a picture or two of it when it's complete. Also, a lot was included in the package, even a glue stick which a VERY HIGHLY RECOMMEND USING with all prints. They say it help things stick, but it keeps things from sticking too well which helps when removing the little pads under each model. Also, the glue is easily cleanable (I use chemical alcohol), I still have some stuff stuck on the printer bed from the first print without the glue, but nothing left stuck from prints with the glue. Someday I'll use the WIFI or USB, but for now I'm just keeping it simple and quick.The only issue I've encountered so far is amazon sellers started sales less than a week after my purchase...Update: It finished printing the fan cover and I added some pics. It's kind of sloppy looking inside, but it's not really the printer's fault. The plastic was flexy near the top until the ends were connected.
P**S
Great 3D Printer for young people and beginners of any age!
I have been using 3D printers for well over ten years, and have worked with an evolving succession of models from four different companies. This technology is getting better and better.My grandchildren have grown up playing with (and loving!) a variety of toys I have made with the printers.When I saw this printer at Amazon, I thought of my 12 year old grandson, and that he is totally ready to start working with a printer of his own!After unboxing the device I set it up. Ha ha… Oh my goodness, there was virtually nothing to do beyond removing various packaging and transit tape pieces. Really, just hook up the filament feeder tube!I thought that before I deliver the machine to my grandson, I should try it out to make sure it was easy to use.It is great! I inserted the micro-sd card into the slot at the top of the machine, and away I went>* I printed one of the designs from the card (the rabbit). The quality was fantastic! So smooth!* I then set up the printer on the network using the combination of steps outlined: Loaded the app on my Android phone. Connected with Bluetooth. Configured the printer on my WIFI network. Then I chose a design from an online collection using the app, and directed it to “slice” the design and print it. The resulting print was flawless! (For anyone reading this who has not ever used a 3D printer, design files are normally in a format with a file extension of “stl”. These files can be adapted to print on a given brand/model of printer by “slicing” the file into printable layers as “gcode” files. Those files contain all the detailed layer by layer “instructions” for the specific printer. This may sound complicated, but the beauty is that to use this printer, you really do not deal with the underlying mechanics of it! You just select a design, and the app+printer does the rest!* Then I selected a design from the well known “thingiverse” web site and downloaded the corresponding “STL” file. This printer comes with two optional “slicer” applications (with versions for both Windows and Mac) on the included micro-sd card. I loaded the MS-Windows version of the “Wiibuilder” application on my computer and loaded the selected design into that app. I then transferred the gcode file to the micro-sd card, and reinserted that card in the printer. Again, perfect results!Some details about the printer:*It has a self-leveling bed which makes it very simple for beginners! (one bit of awkwardness for other 3D printers is the need to periodically manually “level” the print surface.*The print surface is a thin magnetic plate that sits inside the printer on the platform that moves back and forth as it prints. These magnetic plates have become more common on printers. Once the print has completed, you lift the magnetic plate off the platform. By gently flexing the plate, the edges of the final print begin to separate from the plate, and you can remove the print. By default this printer creates a thin pad under each print. (this helps deal with another potential difficult aspects of 3D printing.) it is then easy to peel that away from the print, and you are done! (As with any 3D printer, occasionally a few lines of the plastic printing material is left on the bed. These can be removed with a small metal putty knife of the sort used for patching plaster on walls.* This printer uses small spools of filament. When you shop for additional spools, (and additional colors!) be sure to AVOID the typical 1kg spools. There are a variety of vendors who have 250g spools of 1.75mm PLA filament which will work with this machine. Be sure to check the spool diameter… 12cm – 13.5cm diameters work for this machine. Although the smaller than standard spools may seem annoying, actually it is a blessing. It is nice to print in a variety of colors. I probably have 15 large spools that I use with my other 3D printers. The spools do degrade over time, so the smaller spools used on this printer help keep the printing material fresh!Summary: This is the perfect machine for beginners. The print-bed is smaller than typical machines, but that is absolutely fine for beginners! Everything is simple to use and almost every step is painless. Highly recommended as a first 3D printer! My oldest grandson will love it! And soon I will probably be buying a couple more for my younger grandchildren!
E**E
Fantastic kit for first-timers. Great way to dip your toe into the 3D print world. Start simple.
I think this is a fantastic 3D print kit for beginners. I've been thinking about getting something like this for a while and decided to grab this Tina2S based on a recommendation and after reading the positive reviews of other first-timers.Everything was well packaged, and a few key pieces were secured by tape and foam for shipment. The instructions were detailed with clear steps on what to remove and how to set it up. Just be sure to follow the written instructions, and don’t forget to look at the photos, too, because there are specific cues (like action arrows and shapes of parts).Thinking back - following the printed quick start guide was an excellent way to dip my toe into 3D printing. There are a few different files pre-loaded onto a microSD card so that you can start seeing the machine in action right away. How cool. I picked the "hand" model out of curiosity.The 3D printing process itself is mesmerizing. I couldn't help but just stare at it a lot while it was going. The light stays on the whole time and it's not too loud. I liked how you can see the time on the screen and the completion percentage bar. The finished hand... was certainly a surprise. Posted photos so people can see what it looks like completed. Print came out great but the hand template probably would not have been my first choice if I had known what it looked like beforehand. Still, it was fun to take a gamble!I think the 3D printing world is just so incredibly vast. You can really go as deep as you want to depending on your interest, time, budget, etc. For a casual person starting out like me - this kit is a great way to get started.
Trustpilot
1 week ago
2 months ago