We remain fully operational. Our teams are working around the clock to ensure your deliveries continue safely.

DOWNLOAD THE APP


Customer Services
Copyright © 2025 Desertcart Holdings Limited
DOWNLOAD THE APP


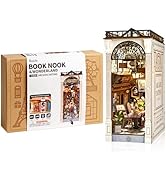
✨ Build your dream bakery, one tiny detail at a time! 🏠
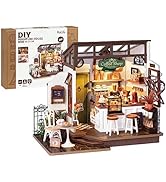
The Rolife Miniature House Kit 'Becka's Baking House' is a beginner-friendly 1:20 scale DIY dollhouse featuring pre-formed wood and plastic parts for easy assembly. Measuring 8.5 x 7 x 7.5 inches, it includes built-in LED lights to create a warm, inviting ambiance. Perfect for adults seeking a creative hobby or a unique gift, this kit combines detailed craftsmanship with therapeutic relaxation.


| ASIN | B0C1Z56CJH |
| Age Range Description | Baby |
| Best Sellers Rank | #74,270 in Toys & Games ( See Top 100 in Toys & Games ) #190 in Dollhouses (Toys & Games) |
| Brand Name | Rolife |
| Color | Multi-color |
| Customer Reviews | 4.6 4.6 out of 5 stars (385) |
| Included Components | Wood Pieces |
| Is Assembly Required | Yes |
| Item Dimensions | 8.5 x 7 x 7.5 inches |
| Item Dimensions L x W x H | 8.5"L x 7"W x 7.5"H |
| Item Type Name | Becka's Baking House |
| Item Weight | 0.84 Kilograms |
| Manufacturer | Rolife |
| Manufacturer Maximum Age (MONTHS) | 1080.00 |
| Manufacturer Minimum Age (MONTHS) | 168.00 |
| Manufacturer Part Number | RL-DG157-Parent |
| Material Type | Wood |
| Model Number | DG |
| Set Name | Becka's Baking House |
| Size | 8.5×7×7.5inch |
| Style | 2.Becka's Baking House |
| Theme | Baking House |
| Unit Count | 1.0 Count |
S**M
So Cute and Easy to asemble
I have a deep love for miniature and making crafts. It has everything you need to make the diorama, from the stickers to the glue. I liked the challenge of putting it together and seeing it come to life. It was easy to assemble and had an easy-to-follow booklet that came with the kit. This would be a good start and addition to your collection for anyone who likes miniatures. My next one might be the Library because it looks adorable.
S**R
Easy to build
This bakery was built to give a young lady incentive to open her own bakery. It was easily personalized and once again fun to build, especially knowing it was going to someone with a purpose.
J**.
Not as snappy and a lot of glue
I had a whole review written, but unfortunately it didn’t save while I was adding more photos. Anyway, I have a lot of experience with Rolife kits, to the point I even completed the pinball machine from them. Saying that, this kit took me one session to complete at 7 hours while watching movies/tv in the background. I’ve only ever done the full wooden kits from them with very minimal amounts of plastic pieces. This is the first kit I’ve had that came with glue. The glue was very much necessary as 75% of the kit needs it, especially for all the plastic shelving units. The plastic pieces do not snap together. The plastic thinner nozzle attachment that was provided with the glue didn’t work for me. I got it attached via heat and it stopped working quickly and eventually just fell off and left a big puddle of glue on my work area. The wood pieces also didn’t snap together as well as I’m typically used to with these kits. The cabinet in the back of the bakery scene was a huge time sink as it kept falling apart until I eventually had to use glue on it. The need for glue in this kit can be a bit of a hassle since it’s messy and the smell gave me a slight headache eventually. The overall completed product, though, is very cute. I had fun making it. The most satisfying part was definitely getting everything assembled and getting to put it all together into. I also had fun assembling the paper boxes. I chose to glue everything down since I made it mostly for display reasons. In the last picture attached is a baby figure from Calico Critters which is a perfect scale for everything. If you’re a fan, there are baby calico critters dressed as bakers that can be bought and would look great here.
C**L
Fun miniature to build! Medium level if you’re just starting
Tip!! Read through the entire manual and make sure you have all the pieces first! This was my first miniature and I really enjoyed it. Thoughts below: Pros: • Labeling made sense and was very clear to understand • Build quality is really solid • No missing pieces! I was actually given a few extras • Such a cute build and the various colors of wood were really nice to see and work with Cons: • Most of the assembly was easy-medium, and this was a laborious endeavor. This is not a weekend project, unless it’s ALL you do that weekend LOL • Some pieces require a little sanding (which they provided in the kit) but you won’t know until you know • The glue gets really tacky and is difficult to use if you’re not used to craft glue. I bought my own, which was a little easier to use • The wall structure popped out frequently with the door, but again, it’s something that can be glued down once finished and fully assembled
M**R
Confessions of a first timer
My first time making one of these kits. I'm male, 51 and "handy" level of maybe 7/10. It took about 10 hours over two days of hands-on work and looks generally like it's supposed to so I'm pleased overall. I had fun doing it and believe this set is good for beginners, although it's helpful to know how to rig things if something goes south and you will benefit from steady, high dexterity/thin fingers or a good set of plastic tweezers (not the cheap ones that come with the kit). It may not be something suitable for a parent/child togetherness activity, although this kit is on the easier side. As a newbie with little innate knowledge, directions and consistency of labeling and being able to find the proper parts to assemble is key. I found this kit ranked highly here and had easy to follow directions from start to finish. Just take some time before starting to review and understand the logic, it's part of the journey. - You will need a lighted magnifying glass at any age as signage is tiny and you don't want to get it upside-down. Also a metal ruler to guide cuts, and a clean x-acto knife to make them. I found some metal clothes pins to clamp a couple of things while glue dries came in handy. - The glue that comes in the kit is difficult to use as you need to heat and attach a nozzle to the bottle. I burned my fingers and made huge a mess of the nozzle, fortunately I had other white craft glue so threw away the glue that came in the kit. Good "craft" tool kits are available on amazon for $8-12 with craft glue also in the $10-$12 range. - There is plastic film on one of the part "cards", I threw it away but it needs to be saved to cut and make bags for loaves of bread. It does say this in the directions, but I didn't see until too late. I tried cling-film but it was a mess. Because of this, the placement of some of my food items differs from template and the breads are not in bags - I glued everything down since I won't be "playing" with it. Not sure if we're supposed to or not and this might be a major faux pas for the purists. I also glued most of the parts together during assembly - it didn't say to very often in the directions but felt it was necessary. It's not as "click together-simple" as implied by the marketing video - The light fixture should have come assembled and wired, leaving only the battery box connection. I get that it's a DIY but stripping wire shielding to expose a wire the thickness of a human hair (and not cut through the whole thing) is challenging and frustrating. Then wrapping the stripped hair-wires around two ends of a tiny LED to connect and THEN using heat-shrink tubing to suck it all together was an exercise in futility. It's too much and does not add to the project. You need the magnifying glass to determine the direction of the bulb polarity (matching the bulb insides to the bulb diagram in the instructions). Despite all the electrical issues and frustrations, my bulb lit up the first time when tested - I recommend a glue stick for the wallpaper as craft glue ridges can be seen through the thin paper used for the walls. Most walls get covered up so I won't lose sleep over it. Glue stick glue can't be adjusted as much after placement as with craft glue but will look smoother. - Sometimes you apply paper to both sides of a wall board (a wall that has both interior AND exterior designs). When you're applying the second side, the underside that you finished is upside-down on the table. Use a virgin surface (like a fresh piece of printer paper) below this as any residual glue or debris on the surface will mark your freshly wallpapered side while you're applying the other side. I had to use my own paper (a design printed from the Internet) to cover up a piece that got damaged - This set does not come with any dust cover so I will be spending 2x the kit value on a custom-sized acrylic box to put it in. Access to the light switch will not be possible as the cord to the battery/switch is not long enough to extend to the floor (and outside the box) - In case you were wondering (I was) the light is not a "Clapper" responding to a snap like the video demonstrates. It's a standard toggle switch on a battery box that goes into a hole in the back wall for access. It would be handy if it was - especially when put inside a case Enjoy!
E**O
Rolife Bakery
This kit has great quality and a very finished look. It is a great gift for those who love mini verse.
F**9
Very beautiful kit that was challenging, fun, and easy to follow. I love how there are tiny details that really make it pop, and how every dessert is very detailed. One thing though, is that it either didn't come with the piece that holds the lamp to the top, or I just lost it.
M**O
La pastelería mini es hermosa, me ha encantado y he disfrutado mucho de armarla; hay que tener paciencia, pero el resultado final vale totalmente la pena. Cada una de las piezas tiene una excelente calidad y me asombró el nivel de detalle que tienen. Nota: Tiene piezas pequeñas así que no la recomendaría para niños pequeños.
C**Y
Super Cute! Loved building it, second one I’ve done from Rolfie, easy to follow instructions with many pictures to follow!
S**N
Love these kits! Fun to put together and very clear directions.
A**R
Great directions and fun to build
Trustpilot
1 month ago
2 months ago