Desertcart purchases this item on your behalf and handles shipping, customs, and support to Brazil.
⚡ Unlock your maker potential with the ultimate beginner CNC — where creativity meets precision!
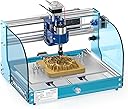
The SainSmart Genmitsu 3018-PROVer V2 is a beginner-friendly CNC router featuring a robust aluminum frame, 10000 rpm spindle, and pre-assembled components for quick setup. It supports engraving on diverse materials including wood, acrylic, and soft metals, and offers modular upgrades like offline control. Backed by extensive online resources and responsive customer service, it’s the ideal entry point for professionals and hobbyists eager to elevate their craftsmanship.


| ASIN | B07ZFD6SKP |
| Amperage | 1.03 A |
| Base Type | Fixed |
| Battery Description | Corded electric |
| Best Sellers Rank | #242,642 in Tools & Home Improvement ( See Top 100 in Tools & Home Improvement ) #18 in Power Milling Machines |
| Brand | SainSmart |
| Brand Name | SainSmart |
| Customer Reviews | 4.2 out of 5 stars 1,284 Reviews |
| Horsepower | 96 |
| Included Components | CNC Router Machine |
| Item Dimensions W x H | 16.54"W x 11.42"H |
| Item Type Name | CNC Router Machine with Full Aluminum Structure for Beginner |
| Manufacturer | SainSmart |
| Manufacturer Part Number | 3018-PROVer |
| Material | Aluminum |
| Material Type | Aluminum |
| Maximum Rotational Speed | 10000 rpm |
| Model Number | 3018-PROVer V2 |
| Number of Items | 1 |
| Power Source | Corded Electric |
| Product Dimensions | 16.54"W x 11.42"H |
| UPC | 816550022917 |
| Unit Count | 342.4 Ounce |
| Voltage | 24 volts |
M**.
This is a great machine. Prepare for an education.
Cutting to the chase, this machine is great. It's built like a tank, assembly instructions were fine, and there are a ton of resourced available online. I got my machine on Sunday, and on the following Saturday was able to cut the piece in my attached picture with no issues. In fact, the only issues that any of my cuts have had were of my own making. The machine works very well. That said, prepare to do some learning, some troubleshooting, and some problem solving. This is my first CNC, but I have extensive experience with 3D printers, and they're the same way. This machine isn't there to hold your hand while carving out intricate masterpieces. It's a tool that you need to learn to use. Another reviewer said something like "8 hours of failure was too much." (I had the same problem that he did. It was solved by changing the "Safe Retracts" setting in Fusion360.) If 8 hours of failure is too much for you, then this isn't the machine you want. To make this (or really any CNC machine) "work", you will need some basic understanding of G Code, 3D modelling, woodworking, and electronics. You don't need to be a master at any of this stuff, but you're going to touch all of it. It will take time. You will screw things up. You will get sawdust in your hair. That's what makes these things fun. Now, more specific to this machine itself, I was very, very impressed. There are many very similar units on Amazon, and I selected this one because of the included upgrades, and the known brand name. I found the machine to be extremely well built, and straightforward to assemble. The inclusion of limit switches is important. While limit switches can be a bit frustrating, they are there to make sure you don't accidentally send the machine a command that will damage it, and the work perfectly for that. I find the offline controller to be wonderful. There seems to be a lot of hate for this part, but I like that I can run he machine "headless" and not have to leave a laptop in my dust shop. I actually had a much smoother experience using the offline controller than I did using the PC-based Candle, but they both do the same job. My motor doesn't wobble, isn't loud, and hasn't had any issue cutting through various woods at 300mm/min. I did several calibration tests on the machine as soon as I got it built, and didn't have to adjust anything. The only bad things about the machine are the hold-down clamps that are included (they work, but are the definition of "fiddly"), the included Vee bits (again, they work as they should, but why give me a bunch of Vee bits and no end mill?) and the size of the workspace. The 3018 is actually a great size for a small workspace like mine, where it will need to be moved and worked around, but just like everyone else, I'd love to be able to make bigger stuff. I've probably said enough glowing stuff about this device, but I'll sum it up, here. When I spend ~$350 on a piece of Chinese technology that's based on open source designs, I expect to get a pretty low-end product that I can usually upgrade to make it useful. In this case, I got a solid, well-deigned, functioning piece of gear. I haven't been this amazed at how well a cheap gadget works since the Elegoo Mars Pro. If you're looking for a cool tool with a steep, but fun learning curve, look no further. If you want to easily and quickly cut wood (or metal) parts with the push of a button, maybe wait a few years. Software That I Used: -Candle (included) for machine control -Easel (very limited free use) for design and GCode Creation -F Engrave (free) for GCode creation -Carbide Create (free) for design and GCode Creation -Fusion360* (free) for design and GCode creation -Inkscape (free) for image design *Fusion360 is the real workhorse, here. It has by far the most features, but also the steepest learning curve. If you're familiar with Fusion360, you'll have no trouble. Otherwise start with Carbide Create.
R**.
The Sain Smart 3018 PROVer CNC
I've been looking at this CNC for months, comparing features and making sure I wanted to take the plunge and buy. Bought it just before Christmas. I noticed that the Amazon page says this machine is pre-assembled. The one I received was partially assembled and I had to attach the sides and gantry to the bottom frame. Putting this CNC together, if you've never done this before, should not be rushed. Take the time to make sure every part of the frame is square and nothing binds up when it moves. If you don't do this, you'll have problems, guaranteed. While a couple tools are included in the box, I would also recommend a straight-edge, a tape measure and some extra small zip ties. While the instructions can get you by for assembling this, there is at least 2 excellent videos on YouTube that will make the entire process much easier. There was a little learning curve in just figuring out what parts were called what. The video makes that pretty straight forward and also shows you some extras on how to calibrate and get the machine ready for your first cuts with CNC. For a CNC newbie (like me), there is a learning curve. Some would consider it steep, while others figure it out pretty fast. This unit, and larger CNCs use GRML as their operating system. It's not too complex but its also not obvious what each command does to the machine. There is a lot of GRML info on-line and the time spent there will move you closer to making life easier with the CNC. Sain Smart also maintains a Facebook group for users of the 3018 machines. Some of the people on that forum are experts and it's worth your time. If you're having an issue, you'll usually get a answer real quick. Lots of very helpful CNC users. I want to say something about the Customer Service part of this because it's worth mentioning. I had a small part fail on day 2 of using the machine. The customer service was quick to respond, we had a quick conversation and a new part arrived at my home within a week. So far, I've had nothing but positive communications with Sain Smart about my machine. Responsive customer service is one of the reasons I bought this version of the CNC. I would recommend this particular version of the 3018 CNC to anyone interested in learning CNC work. While there are many offered on the Amazon site, Saim Smart has a very good reputation and that makes a difference sometimes. Sain Smart put together a good package for sale and they offer a lot of options, upgrades and other items to keep your machine working all the time. Great way to learn CNC work. Price was right too!
B**.
Detailed information and assembly errata
SainSmart 3018-PROver review and errata - January 18, 2020. The materials provided are good: heavy and well-machined aluminum, acceptable quality electronic and mechanical components and fasteners. The 3018-PROver is not nearly as “assembled” as the purchasing data indicates. You can download the assembly video or the manual and see for yourself - there are a couple of hours of assembly work, and there will be much consulting of the online manual, the video, and this errata while you are at it. The three major subsystems are mechanically assembled, but have not had the electrical components, wiring and many little parts mounted, and two major subsystems need to be bolted together. And since the instructions leave a lot for you to figure out, if you’re easily frustrated: choose another project. The PROver version is based on Open Source software and incorporates its own motion controller software: GRBL 1.1. It does not need to be connected to your computer while the router is cutting. Most people will use Open Source CAD software, which does not come with the unit. There is also a “3018 Pro MX3” version which requires that you purchase the Mach 3 software for $175, has a different main controller board and a different hand controller, and requires a Windows computer to run Mach 3 while the router is cutting. The 3018 PROver is a better choice for most people, as it avoids this expense and complexity. Mach 3 is motion-control software, not the CAD software. You will still need to find that. The 3018-PROver controller is based on Arduino. The main controller runs the GRBL 1.1 software developed for Arduino and comes with its own hand controller. Hand controllers for other models, like the one for the MX3 version, are not compatible. Source code for GPL-licensed software in this unit is not on the SainSmart web site as far as I can tell, and it looks like SainSmart still needs to learn how to comply with the licenses to the GPL binary software they distribute, and directly distribute the source code on their own site. I do not know what differences exist from the GRBL 1.1 developer’s source, but I suspect some might exist for the hand controller. This machine will be covered with chips after operation and will require some wiping down, including passing some sort of wipe inside of the T-slots. I will try to improvise a chip vacuum for mine, no such thing is available to buy. To find the assembly video, search for Sainsmart Genmitsu CNC Router 3018-PROVer Build. A few hits down from the top of the search on Google, there is a wiki page for the device at wiki.sainsmart.com . You can also find this directly on the wiki, but the indexing is based on SKU numbers. There are assembly videos for other models on Youtube, which you might find helpful. Most of the tools required for assembly are provided. In addition, you will need a wire cutter to remove two wire ties used as a shipping lock, and a container of light oil to lubricate the lead screws, and some electrical tape to wrap moving wires together. You will need to download the manual and display it on a big screen. That is the only way you will be able to see the photos adequately to be able to assemble the unit. The photos are in a printed manual provided with the unit, but too small and too low-resolution to tell what you should be doing. Here are the errata I noted during assembly: Step 1: You will need to provide your own wire cutter. Step 2: You are told to mount 6 wire holders, but the photo only shows where two of them go! The video is similarly unhelpful! The second two go on the opposite side, identically to the first two. The third two go on the outside of the frame, on the same side as the stepper motor, opposite the two installed inside. Step 3: The four wire holders mount on opposite sides of the metal piece. The photos don’t quite show this completely. Step 5 and 6: The long end of the distance tool is held against the back of the frame, inside the channel. The last slider nut should be against the end of the distance tool. Because of the distance tool, everything lines up well and the 12 bolts go in a lot more easily than I expected. Step 8: The square projection on the slide nut goes outward. Step 9: Peel the protective film off of both sides of the acrylic sheets. They are clear, tinted blue, once you do that. Hold the sheet so that it fits the shape of the leg of the Y-Z assembly. That is the correct orientation. Put the bolts through from the outside, and put the slide nuts on the other side by hand, one turn only. Orient the slide nuts horizontally, and then push the acrylic sheet to the channel so that the slide nuts insert into the channel. Turn the bolts, and the slide nuts will seat correctly. Step 10: There is an error on this page. Where they specify the Y+ and Y- connecting wires, they actually mean X! The VER- numbers are correct, Y should be X. The main controller is attached to two beams, each of which has four channels. The X- limit switch wire must be run behind the main controller along the top of the bottom beam, looping to the front on the side where the controller has the USB connector. The cover strip goes over the wire on the top channel of the bottom beam. Step 11: It may be necessary to temporarily remove the wire holders next to the limit switches so that there is enough space to insert the plugs into the limit switch sockets. Put the wire holders back afterward. Step 13: There are different plugs on each end of the stepper motor wires. Step 15: By “black cover”, they mean the black plastic nut on the barrel of the emergency stop button. Remove that and the square lock washer. Put the switch into the plate, and then put the lock washer on the switch from the back, with the pointy corners facing the metal plate. This button is unusual: push to stop, twist to release. Step 16: Whew! A lot left out here! You are supposed to pass all of the Z wires through a piece of the nylon braided web to protect them from friction. But the piece I was provided, although it can be expanded somewhat, doesn’t expand sufficiently to do this. I wrapped the wires with electrical tape. Operation Before you connect the router to your computer, you can play with it using the manual controller. This is non-intuitive though. I noticed that the files included on the SD card would run into hard limits (trip the limit switches) if run with the router starting in the home position. You will have to move X, Y, and Z close to the center of their operation before starting. The limit switches are confusing. If you are stuck on a limit, which is sure to happen, run the reset function. Move the stuck axis until it stops again - the limit switch will halt the system when it is set, and again when it is cleared! Run the reset function a second time. Then you can move the axis as expected. At this writing I am not sure if configuration will make this easier.
A**F
Awesome little CNC for the money, upgrades easily. Excellent for PCB milling
First off, the caveats. This isn't a $20,000 Tormach CNC or anything like it. However, it IS in the same league of where 3D printers were about 7-10 years ago. If you calibrate your expectations, you will not be disappointed! I purchased this primarily to mill PCBs but also to do a few wood cuts and similar projects. I immediately purchased an upgraded milling motor for future use, as well as the 5.5W laser engraver. The upgraded mill is great for higher-power applications, but the included 775 motor is actually plenty powerful for most engraving and PCB milling applications. If you do upgrade to a more powerful mill, contact Sainsmart for a 3D-printable 52mm bracket - it's the perfect fit for the limit switches. You'll want to purchase 4x LM8SUU bearings (17mm) because the 35mm-long bearings are impossible to find. I damaged mine when I was pulling out the linear rods. Second thing you'll want to do is to resurface (face) your spoilboard. Do this, and you won't need to fiddle with autoleveling the entire PCB or anything like that when milling PCBs. Also, your engravings and woodworking will come out beautifully, same with laser engravings and the like. While the integrated offline controller works okay, this mill is best used with a PC so that you can accurately reposition the toolhead during tool changes. The integrated controller doesn't do a good job there. The depth probe works very well, make sure to replace the included GCode with updated GCode from the manual. The stock probe height is 14.19mm, but I found that mine is actually closer to 14.35mm. Be sure you use a good caliper to measure it. By far the biggest learning curve is setting up your CAD software (e.g., Fusion 360) to work with the mill. However, once you've done it, this thing is super reliable! Same for figuring out things like KiCad - you'll want to make things extra "chunky", by using extra large pads and making your traces larger. I was able to do 0.2mm traces, but those aren't reliable. Instead, I just set 1mm trace sizes and 1mm of clearance, and every board has been perfect. I know it's not ideal for large-scale integration, but that's the wrong application for this mill. Ultimate verdict is this: Take the time to learn this mill's limitations and how to best get it set up. Once you do, you'll be quite impressed. It's easy to set up (the 15 minute setup is nonsense - budget at least an hour), tolerances are quite good, and like I said, it reliably does what you need it to do. At this price, it's impossible to beat this machine!
A**R
Product was damaged, support contacted updates to follow
Although I have not had a chance to use the product yet my initial review will be on it's unpacking, setup and condition on arrival. Was packed securely and when it was received the box was undamaged. Lots of stuff neatly packed in the box. Installation manual was clear with some included videos on the thumb drive. Setup will take awhile but just follow the directions and work carefully and you will have no issues. Everything looked great and went together seamlessly. I stared to set the Z Probe and as the Spindle moved over to the home position and I started to set the Z probe Kit onto the table I noticed a big ding on the top left corner of the table, see the attached pics. Further inspection of the top shows some scratches and scuffs in other areas too. During installation I used the thin flat Styrofoam packing to put the top of the table on to prevent such scratches so I'm 100% sure this is not user induced. Things like this happen and although unfortunate and time consuming (replacements) it's just part of the deal if you are the unlucky one. I don't feel that a used machine was shipped to me but looking at the top and the scuffs and this damage on the corner, it was probably damaged during installation or packing. Either way, I have contacted the seller and requested a replacement bed. I'm ok with that as long as I get a new bed back. I have left a 3 rating for the time being once I get the sellers response and actions I will report back here. Anything less than a "Sorry sir we will get one out to you right away will not bode well". Not asking for a full machine, I'm ok with a replacement bed as long as it's a "New" one. Stay tuned! UPDATE: 17 Jan 2021, So the seller contacted me right away and sent me a bed from China. It was on backorder and is enroute. Unfortunately I had issues with the machine. There is a Z Probe Calibration so each time you place a piece of work on the bed you calibrate the Z Axis with the probe so the machine knows where the surface of your material is. This worked once after that can't get it to work. Sometimes commands are not executed from the machine just when jogging with Candle the software that comes with it. Thought maybe it was a COMMS issue so I tried the offline controller. Same problems. I emailed the company many times, but took forever to get a response, I thought I had fixed the issues by uninstalling the driver and re-installing but eventually the Z Probe Calibration stopped working again. You can calibrate the Z Axis without the probe but why? If it's there I want to use it. Boxed it up and it's on the way back with a new unit to arrive Tuesday. BTW you can't disassemble the machine in 15 minutes let alone assemble it so this is a marketing gimmick about 15 minute install. If you assemble them daily yes you can but as a new buyer you will want to read through the manual and take your time. Think 45-90 minutes to assemble especially if your first CNC. Update 28 Jan, 21. Little bit of a delay in my update but I did receive a new unit. I returned the previous one through Amazon and a new CNC arrived a few days later. This one shipped from a different location. This router appeared to be brand new. Assembled it and everything tested and ran perfectly. I did order a bed extension kit and you guessed it, received it damaged and used. In the process of getting that replaced. So in conclusion, as far as operation, well all I've done for the last 2 weeks is deal with replacing used items purchased as new so really haven't had time to use it. I did mill the top of my spoil board to make sure it's flat. As far as dealing with the company, be warned you have a high probability of receiving used items when you purchase new. Look them over carefully. Not sure if this is Amazon or Sainsmart. If it's Amazon, it's easy to return and just inconvenient. If you purchase anything through Sainsmart, not so convenient and it takes a while but they did replace the bed and the bed extension so I have to give them credit there. I'll leave this at 3 stars due to the headache of multiple returns. EDIT: 8 Feb 2021. So I will make my final review here. I did receive a new unit which works great. I had also ordered a Y Axis bed extension from Sainsmart which arrived used and damaged. Of course I contacted them with pictures and they sent me out a replacement unit that arrived in satisfactory condition. So all in all I have had some bad luck with damaged units and replacement CNC however the customer support has been top notch. So if you do get a unit that is not up to par the Company will for sure make it right. So I will adjust my rating to 4 Stars and have to say that you can purchase with confidence that if you get a bad or damaged unit it will be replaced by the manufacturer. CNC router is together and I'm engraving. Keep in mind, no documentation on how to use a CNC router. For that you will have to go to the Facebook Group, search, read and experiment. Happy Engraving. EDIT: Bonus Content 2/14/2021 I have decided to rate this a 1 star. After I purchased the original CNC router I went to their company website and purchased their laser 159.00 USD. I just now go around to opening it up and installing it and guess what????? You guessed it, there was something missing. The power supply was missing. They sent the power cord which goes from the wall and to the power supply but no power supply. So I have a laser and no way to power it. I Do NOT recommend purchasing from this company. If you decide to sear TUMS you will need them.
A**R
Great for beginners
Fun little CNC. I wanted to try using one before dropping thousands of dollars on one. I love this little guy. Carbide v6 and Gsender work great with it.
T**M
Well, It got better...
I think its defective and support is really slow to get back to me. The prober function does nothing and I've gone through all the documentation for setting the Gcode and positioning. I bought this specifically for PCB milling and thus it is useless to me without the prober and heightmap feature. So far I'm not impressed with support, it's been a couple days and no information. They acknowledged my question and said it would be 2 or 3 days to get back to me. I'm close to packing this up and sending it back. It's either a bad controller or some stupid simple undocumented setting.... I reserve the right to update this review if they eventually get back to me and can resolve this. I'd really like it to be something simple so I can use it. I have a big 4' x 4' CnC router for wood working so I am not a newbe with CnC. Unhappy Tom Update 6/30/21: So it was a stupid setting. Turns out the soft limits were interfering. This YouTube tutorial, https://www.youtube.com/watch?v=u4Mcjz7IP10 while otherwise very good had me turn on Soft Limits; $20. This seems to be the root of the problem. I can't say if Soft Limit's would have worked with different travel settings as I've not investigated that. I also had a problem with the $90 setting and ended up using $91 instead. I also have not yet tested to see if I can go back to using $90 now with Soft Limits disabled. These are the settings I used: G91G21G38.2Z-20 F100 G92 Z00.00 G0Z2 M02 Note that I have 0 offset for the prober because I am only working with copper PCB and thus I have removed the prober puck and am probing right to the PCB copper layer. The Soft Limit's issue was not SainSmarts problem, I do recognize that, but I do wish they had some better documentation on the the setup and calibration, it might have saved me several days of trouble shooting. At any rate I had success and isolated my first PCB. The heightmap function in Candle was critical to this. I actually like USG better than Candle but USG does not have a working Heightmap function. That's not SainSmarts problem. I have more tuning and testing to improve my PCB work but that all me. The SainSmart 3018 PROVer seems to be a decent little CnC, perfect for what I want to do with it. It's not got a lot of power or working area but that's not needed for the PCB's I'm working with. It's about $100 more expensive than other 3018's but it comes with the emergency stop switch, the hard limit switches and the probe. More importantly the probe connection on the controller. All of which I felt are important. It was pretty easy to assemble and to calibrate. The YouTube video I mention above is a really good tutorial for setting up and calibrating minus the SoftLimit setting. All in all I am now much happier with it and look forward to more PCB projects. I do wood working with a larger CnC machine, I don't know how this little machine would do anything other than engraving, but PCB isolation seems pretty reasonable. Now about support; They are there, I.e., they do have support. They were slow to respond and ask questions but they never actually helped resolve the issue, perhaps they would have eventually but the the help I received was from a member of a GitHub CnC forum. Thanks to ondras12345! I would have given this more stars but for support. I thank them, but they didn't seem to be very interested in helping until I posted the negative review and even now they are more interested in getting me to edit the review to positive. That cost them a star. The product is adequate for the job, seems solid, easy to assemble. Had I not had this issue and/or a better result with support they would ahve probably got 4 or 5 stars.....just sayin. Tom, no longer unhappy
F**I
Easier than expected.
The CNC came nicely boxed, with all parts, and (mostly) clear instructions. One axis was labeled Y twice, but other than that, no other typos. Amazingly, even without full calibration, the test files worked right away! It definitely takes some tinkering if you want to mill your (or someone else's) 3D models. That said, I'm impressed with the build quality and fits of all the parts. It's well engineered. Recommendations: 1) start with dense foam insulation as you can rip thru it without endangering the drill bit. Later, experiment with soft woods and such. 2) Find some slicer software to turn STL models into gcode. I found kiri:moto is free and works great. I have found that I needed to edit the top header of the gcode it created, but that was just copying and pasting the top few lines from the examples into the created gcode, replacing the startup sequence (easier than it sounds). 3) Learn a little bit about what gcode is. It's a line by line series of commands that control the CNC. It's all text and is pretty simple. Mostly, just know what the machines wants (everything measured in mm) and give it that. :) Again, the supplied examples that came with the machine will help you figure that out. 4) the Candle software works great (and its cool watching it model the tool path), though I found it freezing up on long runs (more than an hour). I now make the gcode, offload it to the (supplied) microSD card, plugged it into the offline controller, and ran the file directly; no mid-mill faults with this method whatsoever. 5) milling generates a LOT of fine shavings. Have a vac or dustpan nearby. I decided to buy a plastic, translucent, container I can put over the whole machine while it runs, to help contain the dust and shavings. 6) The machine is pretty quiet. I have it running in the garage and when I enter the house, I can't hear it at all. That said, I think the above mentioned cover will also deaden the sound a bit more (it's high-pitched noisy next to the machine). 7) A bunch of engraving bits are supplied, but I'd recommend buying some additional end-mill bits if you plan to do milling with depth (i.e. not just cutting words into a flat plate) as the supplied knife-like bits aren't the best for that task. 8) getting this slightly more expensive version with the hard stops and emergency stop button has already paid off. I can't imagine getting a machine without those. I'd have ruined it with my first self-made gcode. That may be just me, but if you haven't done milling before, get this machine to provide a modicum of forgiveness to your first solo runs. All in all, I'm really happy with this machine! It's an experiment, but a well-functioning one.
M**L
Fantastische machine en eenvoudig in elkaar te zetten en eenvoudig in gebruik.
Ik ben zeer tevreden met de 3018-PROVer V2. Het product was goed verpakt en de handleiding is gemakkelijk te begrijpen. De meegeleverde software is eenvoudig te installeren en gemakkelijk in het gebruik.
T**O
Fast shipping and great support
Il pacco è arrivato con qualche giorno di anticipo, che mi ha lasciato molto contento. Il prodotto è ben impacchettato, tutto è tenuto ben fermo da spessi strati di polistirolo. Unico difetto, nella mia scatola dei bulloni ne mancavano 2 M6, ho contattato il supporto SainSmart che me li ha recapitati in meno di 4 giorni. Il montaggio è semplificato rispetto ad altri prodotti ma richiede comunque un certo tempo, io ci ho messo circa 1 ora e mezza a completare tutto, e non ho messo il proteggi cavo in nylon perché mi riusciva male. Sono comunque molto soddisfatto perché le risorse fornite (sul sito sono presenti anche video tutorial) aiutano moltissimo e non c'è nulla da fare di veramente complicato. Una volta montata la CNC si presenta esteticamente molto bene, solida e con un colore azzurro che mi piace molto. Io la vorrei utilizzare principlamente per produrre circuiti stampati di progetti DIY, le prime prove mi hanno dato molta soddisfazione anche se ho ancora molto da imparare! Nel complesso la consiglio a chi ha tempo e voglia di imparare e studiare le varie tecniche/tecnologie per la fresatura con la CNC, lo sconsiglio a chi invece preferisce avere una soluzione "plug&play" che faccia subito tutto bene senza bisogno di metterci le mani. Allego qualche foto, scusate per la mia scrivania super disordinata :) ==== Automactic tranlsation in English ==== The package arrived a few days in advance, which left me very happy. The product is well packed, everything is held firmly by thick layers of foam. One defect, in my bolt box there were 2 M6 missing, I contacted SainSmart support which delivered them to me in less than 4 days. The assembly is simplified compared to other products but still requires some time, it took me about 1 and a half hours to complete everything, and I did not put the nylon cable protector because it was bad for me. I am however very satisfied because the resources provided (there are also video tutorials on the site) help a lot and there is nothing really complicated to do. Once mounted, the CNC looks aesthetically very well, solid and with a blue color that I really like. I would like to use it mainly to produce printed circuit boards for DIY projects, the first tests have given me a lot of satisfaction even though I still have a lot to learn! Overall, I recommend it to those who have the time and desire to learn and study the various techniques / technologies for CNC milling, I do not recommend it to those who prefer to have a "plug & play" solution that does everything right away without having to get their hands on it. I attach some photos, sorry for my super messy desk :)
T**S
Très bonne petite machine.
J’ai sauté le pas il y a un an avec cette petite machine et je vais en racheter une autre en version laser, cette petite machine me permet de fabriquer toute sorte de platine et pièce pour du modélisme Rc. Elle est très précise, solide car zéro problèmes depuis, pas trop bruyante et facile d’utilisation, couplée au contrôleur hors ligne et des bonnes fraises. Je recommande vivement.
M**L
Excellent value for money!
Excellent value for money, this was my first CNC machine so started out opening the box with no knowledge but instructions made set up easy and I was running my first cut within a couple of hours. Whilst the size of the cutting area can restrict some projects/ideas it is big enough and strong enough to handle any smaller jobs you may have. The motor is strong enough to handle acrylic, auto ABS, PVC, hardwood and even bone. Any issues I had with this machine were due to user error (wrong cut speed for type of material, wrong depth per pass etc) so it’s worth reviewing and learning the basic physics of how these parameters can change your cut. It would also be worth picking up a set of different sized collets when ordering as you’ll likely need these as you get further into CNC cutting.
P**A
コンパクト&イージー +ナイス・フォロー
21年4月購入。殆どプリアッセンブリされた状態で、部品もコンパクトにしっかりまとまった梱包となっている。メカ組立は容易で、電気配線もリミット他モジュール盤を指定の場所に取り付け配線するだけで、線の長さもピッタリになっておりつけられた線番タグ通り接続するのみ。ビギナーとして始めるにあたり馴染みやすい。まだcandleを使って多少の彫刻加工しかしておらず、まだそれほど使ってないですが、木材で簡単な加工がすぐに始められました。装置ガントリ部固定ナットのうち1個に不良がありましたが、サポート(日本語)により、追加のナットを送付してもらえました。欲を言うならば、Z軸ストロークがあと10~20mmあれば、使える工具幅も増えて使い勝手が向上するかと。同様に付属のプローブ厚みがもう5mmほど薄いほうがよいかもしれない。そしてアンチバックラッシュのバネは、もっと強いほうがいいと思います。 2022.6追記) 突然、Z軸動作不良でワークにエンドミルが喰い込み干渉のトラブル。調べた結果、z軸モーターケーブルの断線と判明。本件、製造&販売者のカスタマー・サービスへ連絡したら、素晴らしいサポート(日本語)対応で問題が解決。その他にも問合わせに丁寧な対応があり、購入後のフォローもなかなかしっかりしていると思います。
Trustpilot
1 week ago
1 month ago