We remain fully operational. Our teams are working around the clock to ensure your deliveries continue safely.

DOWNLOAD THE APP


Copyright © 2025 Desertcart Holdings Limited
DOWNLOAD THE APP


Buy anything from 5,000+ international stores. One checkout price. No surprise fees. Join 2M+ shoppers on Desertcart.
Desertcart purchases this item on your behalf and handles shipping, customs, and support to Brazil.
🚀 Build the legend, own the legacy!
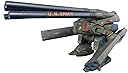
This Bandai Spirits plastic model kit is a Japan-imported, 1/200 scale collectible featuring the iconic Hawk-002 from Macross. With authentic retro packaging and detailed parts, it offers a nostalgic yet precise building experience perfect for hobbyists and collectors alike.
| ASIN | B0045T1JBQ |
| Additional Features | Plastic model, yScalez 1/200 |
| Age Range Description | Kid |
| Art Craft Kit Type | Plastic model |
| Brand Name | BANDAI SPIRITS |
| Color | Multicolor |
| Customer Reviews | 4.4 4.4 out of 5 stars (146) |
| Included Components | Plastic model kit, Hawk-002 subject character, assembly parts |
| Item Dimensions | 12.09 x 8.11 x 2.68 inches |
| Item Weight | 254 Grams |
| Manufacturer | bandai |
| Manufacturer Part Number | BAN966791 |
| Material Type | Plastic |
| Number of Pieces | 1 |
| Product Style | Retro |
| Scale | yScalez |
| Seasons | All Seasons |
| Set Name | Macross |
| Size | Medium |
| Subject Character | Hawk-002 |
| Theme | Anime |
| UPC | 798525393102 787799247709 |
S**N
Great model box ruff handeled
Got it back really fast allways wanted this kit i love Macross both boxes tape was broken and one had a hole in the back nothing wrong with contince Great detail on parts for a older kit can't wait to build it up
D**B
Great model
Super cool model should be fun to build.
G**Y
First attempt with Macross kits
A rather easy and straight forward build, it could easily be done in a quick afternoon. Parts are big and go together with not much gaping. I was happy to see that Bandai went ahead and added rifling to the main cannon barrels. After assembling the arms and legs can be taken off easily for painting. Being a rather old kit the plastic is hard and somewhat unforgiving, unless lots of care is taken separating pieces from the sprues will leave pitting. Easy to fix with some putty and sanding but a little annoying. The instructions are very basic and can be confusing because they don't really show enough detain in some areas. This is especially true in the case of installing the bottom panel with the hinged lid. It looks like the hinge should sit on the outside but in actuality it needs to be inside the body. Try and dry fit before you glue!
D**L
Excellent topic
Hard to find subject
R**2
No me percate que eran piezas para ensamblar, demasiado básico y el material es plástico simple. Demasiado pague por un producto muy básico. Mala compra hice.
I**.
Macroos Destroid HWR-00-MKII
This is a grate model kit for macross series lovers. I've been expecting this monster mecha for almost 30 years. Thanks to Mr. sato from Supply Japan.
M**E
wonderful
I love this destroid!!!!!!!!! it is just a great kit and I wished it was cheaper in the bigger scale
F**D
Alot of pieces
I never finished it because there is to many parts and models aren't my thing, but if it is a hobby of yours you would probably enjoy it
ア**郎
まだ完成させていませんが、山は超えましたのでレビューします。 先ず、このキットは昔のキットの再販で、組立には接着剤が必要で、成型色は緑1色なので、設定通りの彩色にするには塗装が必要です。 合せ目も目立つ位置にありますので、見栄え良く完成させるにはヤスリがけも必要です。 以下は、それを踏まえた上での意見です。 私的な意見としては、プロポーション、ディテールともに、及第点以上の出来と思います。 流石は、キャラクターモデルの経験豊富なイマイです。 私が問題に思った部分は、以下の部分です。 1、ポリキャップ未使用な為に間接がヘタリやすい。 2、砲身が接着固定であり、本体塗装前に接着すると本体上部の塗装ができなくなる。 3、合せ目の段差が大きく処理がたいへん。 次に私なりの解決策です。 1、基本的に間接にビニールをはさんで組み立てて、それの出来ない部分は、ガンプラの余ったポリキャップを組み込みました。 2、塗装後に内側からネジ止めできるように改造。 3、合せ目消しは、近年のガンプラでも必要な作業ですが、この時代のキットは、段差が大きいので削る量が多いです。 普段より粗めのペーパーも用意しました。 入り組んだ部分は、あて板をしたペーパーだけでは削れませんので、金属やすり、彫刻刀、小さいノミなどを適材適所で使用して削っています。 PS 私の途中作品(サーフェーサー状態)のカスタマーイメージをアップしておきました。 プロポーション、ディテール、全くいじらなくても、この素晴らしさです。 PS(2) 塗装して、デカールも貼り終えました。 デカールは、良質で貼りやすく、艶消し処理されていました。 あと、完成画像をカスタマーイメージでアップしておきました。 外観的には無改造ですので、ストレート組みの作例として見ていただければ幸いです。
A**R
Parece que va a ser rápido de armar si no se le quieren dar muchos detalles al modelo, traía todas sus instrucciones y todas sus partes a pesar de que la caja venía abierta.
H**I
Well, the final product is cool, and this was a very fun build, but the instructions and pictures imply pre-coloured pieces and this was certainly not the case. It ended up being better for me since I wanted to paint the whole thing anyways. The bigger pieces, the worse warped. Mainly a problem on the center body pieces. I'm still not sure if the limbs were intended to be movable, but since the fit was so tight I didn't glue them and the model is pose-able. The instructions were pretty easy to understand visually, but when attaching the disc where the arms meet the gun things, I was unsure whether to glue or not since it didn't really 'sit' anywhere. Didn't matter since even after gluing they fell off because they don't have much contact where they go. And just a tip from one picky builder to another, getting those howitzers to glue on straight and properly spaced at the right angle is hell. I had to build the craziest K'nex rig to hold them in place. I got this because I wanted the Destroid Monster on my shelf, not because I wanted to build it. But since model planes was an old hobby of mine, I had no problem bringing out the old building supplies. Have fun with those decals, lol.
C**N
Este modelo puede ser armado sin necesidad de pinturas y pegamento, pero si se quiere obtener todo el detalle del mismo deben trabajarse las líneas de unión y hacer trabajo de pintura. Es un modelo divertido para armar.
ウ**ヌ
今回製作したのは 2010年11月?にバンダイから再版されたものです 相当寝かせましたが、やっと完成 ●全景 プラスチックは 若干柔らかいものになっています スナップフィットではありません 接着が必要なキットです 旧世代のいわゆる モナカキットです ポリパーツはありません 接着面も均一ではない(断面が均一でない)ので苦労します 段差もできます それだけでなく パーツの分割や、組み立て順なども 今、改めてみると なんでこうしたんだ?という個所も 多々あります 当時としては 企業担当者側がいろいろと考慮した結果なのでしょうけど ▽●▲〇●特に難儀したところ▽●▲〇● 最中キットで仕方ない部分もありますが 挟み込みが、妙に多い ●両腕 両腕のロケットランチャーの組み立て時に 上腕を挟み込むことになります 肩も上腕を挟み込む パテ盛り、合わせ目消し、塗装を考えると 結構厳しい 上腕とロケットランチャーの接続は ポリパーツを使用(ガンプラの余剰分を利用) はるか遠い昔、当時製作した時もやったのですが ロケットランチャーはハッキリ長すぎると印象なので 15mm短くしています ●足 太もも部分、脛?部分、足首 これも挟み込むことになります 今回私は、アニメ設定に準じた 2色の塗り分けとしましたので さらに厄介 足首と、股関節+胴体取り付けば ポリパーツ(ボールジョイント)に変更しました こういうことはほぼやることがないので結構苦労しました ●主砲取り付け 4門ある主砲ですが 此れの取り付けが相当厄介 位置決めしにくい この部分、あの当時 製作したときにも 結構手こずった、難儀した記憶がありましたが 記憶違いでなかった(苦笑) 記憶違いであってほしかった 私はやりませんでしたが 可能ならば 主砲の凸部分を大型化 何より、胴体側に、これを受けるための凹形状を 設けておくのが良いかと思います 基部のカバーも、フィッティングは 今一つ良くありません ●お尻のハッチ?バランサー? 開閉部分がありますが この可動部分取り付けも 塗装など考えますと、結構厄介です 胴体側にアーム部分を組み込んでおいて 塗装後にハッチの取り付けとしましたが 部品番号6 の接着が甘く、作業中に取れてしまった この部品、接着代はほぼありません 外周からプラバンなどで補強するのが良いかと ※塗装 今回アニメ配色を準拠としています Mrカラーにて 本体 54番 カーキグリーン 関節など 304番オリーブドラブ 主砲 15番:濃緑色 ※水転写デカール 寒い時期になってきましたのでお湯を使っていますが それでも、なかなか台紙から剥がれない、糊が溶けません (熱湯を使うと、皺くちゃになる可能性もあるので要注意) 久々にバンダイのデカールを使いましたが 相変わらずの低クオリティー だな!!と再確認とともに ガッカリしました 文字なども・・・コーション類に不鮮明なもの多数 ベースはイマイの版下を使いまわしなのかな? とはいえ、シャープな個所も多々ある不思議 一部、改訂なのか? ※※ 総評 ※※ 当時としては相当良い出来のキットではありました あの当時なら・・・ バンダイよりイマイの品質は上だったと思います ついでにタカラもバンダイより上だった(あくまで個人的意見) しかし・・・40年以上の年月を超えて作ってみますと やはり今現在はバンダイ・タミヤ筆頭に 国内海外、各社技術向上したんだなぁ~~~~~~ とも思いますね (遠い目) ということで 無理して購入するキットではありません ほしい人はすでに購入でしょうし 今現在は、プレバンでだけ?販売なのかな? そうなると ますます無理して購入するものではないと思います これで普通に用意に購入できるならまだしも・・・ ガンプラすら何年も放置 転売屋120%応援なので バンダイという企業そのものが購入者目線は一切無くなり また、改善する気すらも、一切ないのでしょう やはり作りにくい イマイへの敬意を入れても 星 3つ です ●余談 モンスター親衛隊も作っていましたので 完成までに大幅に時間がかかりました ダイダロスアタックのつもりで 雰囲気だけ どうぞ! デストロイド隊の数が異様に多いって? モンスター2機目(01号機)の構想があるからです ( ̄▽ ̄)
Trustpilot
1 month ago
3 weeks ago